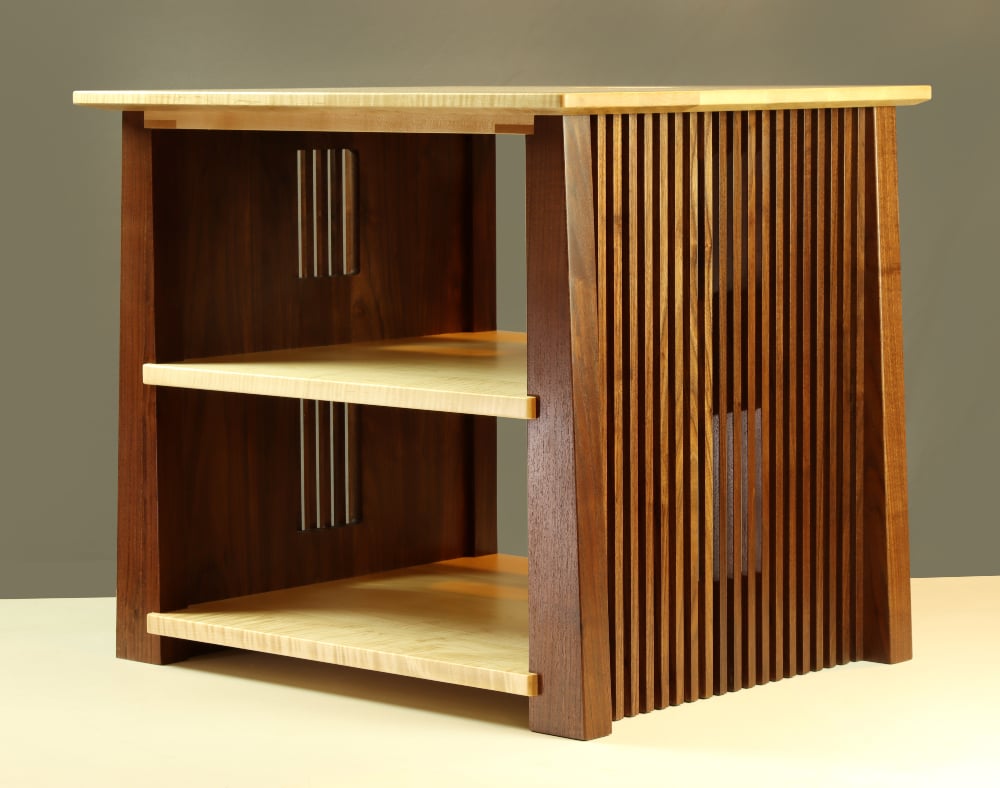
Woodworking projects come in all shapes and complexity levels. My favorite projects are medium-sized pieces, the kind that sit at the intersection of furniture building and cabinet making, like a cabinet or coffee table, with a little detail that catches your eye. Store-bought furniture can be functional I suppose, but as woodworkers, we can design and create a furniture piece exactly how it needs to be. Sized to fill a space perfectly, or satisfy a specific purpose in the home. The project at hand is a solid hardwood stereo rack with a mid-century modern vibe and interesting pass-through windows in the side panels. Other details include long, gentle tapers on the solid walnut legs, vertical channels in the side panels, plus an undercut bevel on the maple top.
Want to make this project yourself?
Download Project Plan
It all starts with a stack of walnut and figured maple lumber. Every piece in this stereo rack project is solid hardwood lumber – without a trace of veneer or plywood. For the walnut side panels you’ll have to be particularly selective. Weed out any knots or blemishes in the wood to avoid problems later. For the maple panels, let aesthetics guide your decision making. This is a great place to show off some highly figured maple.

Cut a series of grooves and notches in the walnut legs. The long groove in the legs provides good mechanical strength with the walnut side panels, while the notches receive the maple shelves. Finish with a rabbet on the top end that will eventually accept a web frame. Notice how the ½” depth of cut exactly matches the long groove location.

Taper the walnut legs so they’re narrow at the top, and wider at the bottom. The cut is pretty smooth coming off the bandsaw, so a light trim at the jointer is all it takes to complete the leg components.

Next, cut a series of through grooves in the side panels with a dado blade. I set my Fusion F2 up with a ½” dado stack and cut grooves spaced ½” apart. The key thing is to start the first groove 1” from the edge of the panel. Also, leave your panel a little extra-wide for now, and rip it to final width after all the grooves are cut. That way you’ll be sure to finish with exactly 1” of solid wood on the far edge of the panel.

Okay, here’s where the project gets a little crazy. I wanted that little extra detail in the side panel that would give a light airy feel, and play with the light that passed into the cabinet. With that goal in mind, I built a template and routed two rectangles into the panels. This was done from the inside face of the panels, to preserve the long grooves already milled on the outer faces. Use a bearing-guided bit on your plunge router, and make the cut in multiple passes until the gridwork is exposed.
TIP: Make sure to perfectly align your template with the grooves for best results.

Glue the side panels between pairs of legs for the side assemblies. Here you can see how the side panels fit snugly into the grooved legs. The rationale for spacing the first panel groove 1” from the edge becomes apparent. Which of course is simply to allow uniform appearance of the grooves once everything is assembled.
TIP: Check that your notches are flush with the side panels. This will enable the maple shelves to fit properly in the next step.

Now make a web frame that will be the sub-top of the stereo rack. It’s made from strips of ¾” thick maple sized 2-1/8” wide and 23-1/8” long. A good tablesaw and a sharp dado blade are essential for this project, and you’ll make use of them at every turn.

Rout any holes as desired for cord management, and glue the maple shelves together with the side assemblies. Trim the web frame to 23” square, and dry fit it into the rabbets.
TIP: Use your leg offcuts as clamping cauls for a nice square cabinet.

Reinforce the web frame with pocket hole screws through oversized holes. The web frame is glued to the legs at the front of the cabinet, but don’t glue it at the back. Drill a double-wide pocket hole at the back of the web frame to allow wood movement, and secure it with screws only.

Optional leg levelers. Drill recessed holes for threaded leg levelers. I first wrote this tip for Woodworker’s Journal Magazine years ago, and I’ve been using it on furniture projects ever since. This technique lets you level the piece of furniture as desired, yet the levelers are hidden from view.
The shelves are reinforced with pocket hole screws, and filled with maple plugs from the bottom side.

Apply the finish of your choice. Here, I’ve wiped on Watco Danish oil in a Natural (clear) color to bring the walnut to life. After the Danish oil dried for 24 hours, I sprayed multiple coats of lacquer in a satin sheen. A little scuff sanding between coats, and wet sanding the final coat achieves a buttery soft finish.

The figured maple shelves stand proud of the legs at the front of the stereo rack. At the back, I made them flush with the legs. There’s something pleasing about the contrast between the walnut and maple once the finish is applied. Rippled figure in the maple shelves give the project a one-of-a-kind look.

The maple top gets an undercut bevel to lighten the overall look, while still being quite strong. After finishing, the top panel is screwed to the web frame from underneath. Pre-drill and counterbore oversized holes in the web frame to allow the top panel to move with seasonal humidity changes.
The visible half-lap joints provide another interesting detail when you take a closer look.

Here are the overall dimensions for the cabinet, and if anyone wants to tackle this project, I’ve included a materials list as well.
Fill Out The Form To Receive The Stereo Rack Project Plan
Stay tuned for our 3-part "How To" video series on YouTube featuring a step-by-step guide on building this project! Subscribe to our emails to get notified!
Willie Sandry is a Freelance Writer, blogger and crafter. Check out the latest projects on his YouTube channel ‘The Thoughtful Woodworker’