Rabbets Rule
In the world of cabinet making, there’s no quicker or easier joint than a rabbet. Cabinet makers rely on them as a bread and butter joint used each and every day in the shop. A rabbet joint used solely isn't the strongest joint around. However, when applied to cabinet use, it’s one of many joints holding the cabinet together, making it efficient. When reinforced with brad nails and glue, they can easily last a lifetime.
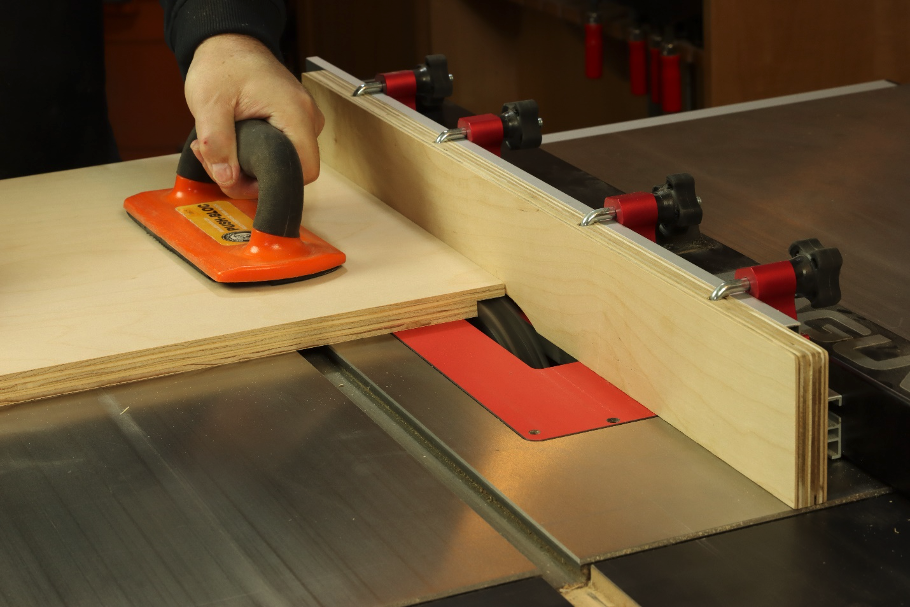
Dado Setup Board
Grab a scrap of plywood, and take a few minutes to make a dado setup board. It will take you about 15 minutes to make, but will save you hours of setup time in future projects. The table saw of my choice and featured here is the Laguna Fusion, check out Laguna's line up to see what table saw you can upgrade to. To continue, make a short groove with a nominal ¾” stack, and with all common combinations of chippers and shims. Next time you build a bookcase or cabinet, you’ll find a quick and easy match to your undersized plywood. 
Start Flat
Woodworkers' building cabinets strive to make flat hardwood panels. If you start with flat panels, every subsequent step in the process becomes easier. Use small F-style clamps to align the ends of the boards as you clamp them together. Then alternate your main clamps both top and bottom for even clamping pressure. Finally, check each panel in several spots with a known straightedge, before setting the panels aside to dry. 
Use the Right Jig for the Job
Your father’s generation might have drilled shelf pin holes freehand, or with a scrap of pegboard. A purpose-made shelf pin drilling jig is a better option. They ensure the holes are spaced evenly for rock-solid shelves that don’t wobble. Plus, they have specialty bits that not only drill the proper size hole for your shelf pins but automatically limit the depth so you’ll never accidentally drill through your project. 
Old School Doweling Jig
When installing a “ball catch” use a self-centering doweling jig to center the hole on the thickness of the door. 7/16” diameter brass ball catches work great on the 7/8” thick glass doors I typically build, but smaller versions are available as well. 
Vix Bit Centers the Hole
Use a Vix-style self-centering bit to install cabinet hardware. With the pull clamped in place, you can easily drill two of the holes to mount the hardware. Install the first two screws, usually installed diagonally from each other so the hardware can’t shift. Then pre-drill the other two holes. Just like a bit for drilling shelf pin holes, Vix bits are depth limiting so you’ll only drill ½” deep.
Start Square
Why do cabinets come out square? Because the panels and joinery we use to build them are square. With that in mind, use a large crosscut sled for truly square panels and parts. It’ll get your project off to a great start. 
Let Your Work Stand Proud
As beginning cabinet makers we all tend to install parts flush with one another. As you grow as a designer and builder, you may want to let select components stand proud of adjacent parts. Here, a maple shelf protrudes slightly past a thick walnut leg for an interesting reveal. 
Tablesaw Joinery is Tops
You’ll be amazed at what you can build with a simple table saw joinery. A combination blade and a dado blade are all it takes to build these handsome mission-style cabinet doors. Even now that I have some fancy router bits in my collection, I still prefer to build cabinets at the table saw whenever possible. 
Drill after the Finish is Applied
Here’s a tip that doesn’t make sense to some woodworkers, and requires a little explanation. Drill any holes in your furniture or cabinet after the finish is applied. Otherwise, the topcoat tends to accumulate in the holes, and create unsightly runs in the finish. Plus, in the case of shelf pin holes, thick finishes such as gel stain will make it difficult to fit the hardware. So, skip the frustration and apply the finish before drilling holes in your project. A Q-tip dipped in matching stain or dye helps darken exposed holes for a more natural look.
Recommended Articles

- March 5, 2025

- February 17, 2025

- February 13, 2025