This style of woodworking joint goes by a few different names; cross lap, cross halving, half lap… But no matter what you call it this is a great joint to master on your CNC. It’s very strong and allows you to create knock down pieces; items that can be assembled and disassembled repeatedly. We’ll stick with the name cross lap for this article.

A cross lap joint provides a handy way to add legs or supports to a project.
What you need to know
The stability of a cross lap joint comes from a good friction fit between the components. You need to take accurate measurements to make this joint work well.

Measure the thickness of your material. Digital calipers are the best tool for this.

Measure the cutting diameter of the bit you’ll be using.
Cut test pieces
When you’re doing a project it’s best to do test cuts before laying out the project so you can dial in the fit. The test cuts should be done with the same material and bit you’ll be using for the project. VCarve Pro is the software being used in this article.

Start a new job using a 12” x 12” piece of material.

Use the Draw Rectangle tool to create a 2” x 5” test rectangle. The size of this rectangle isn’t critical.

Use Draw Rectangle again to create a rectangle that is the size of the cross lap joint. Start with a width that’s equal to your material thickness. Height should be slightly more than half the width of the test rectangle.

Use the Align Bottom tool to position this rectangle against the edge of the test rectangle.

Draw another rectangle. The width should be slightly more than the width of your test rectangle, and the height should equal the material thickness.

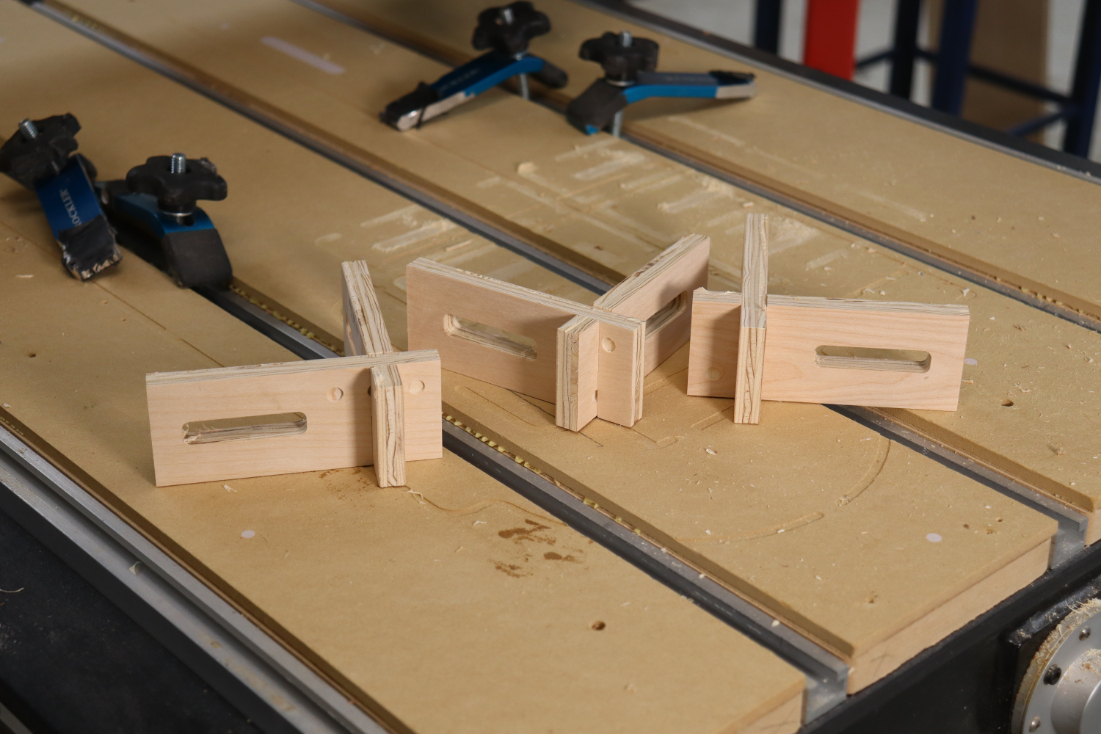
Your test piece should look like this.

Use Interactive Trim to cut open the cross lap joint.

The test piece should look like this.

Copy and paste the test rectangle so you have two halves of the joint.
Create more test options
Part of the test process is checking exactly what dimensions you need to use to get a perfect fit. We’ll create two more test rectangles to dial this in.

Repeat the process in a new test rectangle making the cross lap cut .003” larger than the thickness of the material…..

…and the internal rectangle the same width but also .003” wider.

This gives you another test rectangle with different cut dimensions. Align the cross lap cut with the edge, use interactive trim and copy and paste so you have a mating piece. Repeat this process one more time making the cuts an additional .003” larger.
The goal of multiple test rectangles is to make one trip to the CNC and have the correct fit figured out.
Keep track of your tests

Since you’ll end up with multiple pieces it’s best to have a system that helps you keep track of the parts. Use Draw Circle to add identifying circles to the test pieces.

Use the circles to identify mating parts in your layout.
Toolpaths

Select the test rectangles and use the 2D Profile Toolpath to cut them. Select the bit you’ll be using.

If, when you measured the cutting diameter of the router bit, you found the dimensions to be different than the bit library’s dimensions, you need to edit the bit’s info. Sharpening a router bit reduces its diameter. The bit shown earlier has been sharpened a few times so its current diameter is less than its diameter when new. Click on the Edit button.

Enter the actual diameter of the bit in the Diameter (D) box.

Add Tabs and Ramps. Check the Do Separate Last Pass box and use .015” for the Allowance. This is similar to what you might do with a conventional router; remove the bulk of the waste and then do a light final pass to optimize cut quality. I also find that this approach gives me the most accurate dimensioning.

Use the Pocket Toolpath to cut the internal rectangle, again editing the bit parameters.

Use the Drilling Toolpath to drill shallow identifying marks in the test rectangles.

Preview Toolpath allows you to double check your work and make any necessary changes.

Since the same bit is being used for all of the cuts you can output the toolpaths together and they’ll run back-to-back on the CNC without you having to select and start each individual toolpath. Check the Output all visible toolpaths to one file box to make this happen. If you get a warning indicating that the toolpaths don’t all use the same tool you most likely forgot to edit the bit parameters in one of the toolpaths.

Secure your work to the CNC and run the toolpath.

Cut the tabs so the test pieces are free of the board and check the fit of each mating piece. Don’t intermingle the test pieces. Number 1 must stay with number 1, and so on. In addition to checking the fit of the cross lap slip the part through the mortise and check that fit. The parts should slip together with hand pressure, but not be wiggly when assembled. In the cross lap joint the edges of the pieces should end up flush. If they don’t, increase the depth of the joint.

The mortise is useful on projects like these knockdown sawhorses that have a rail at the top AND in the middle of the sawhorse leg.
Once you know which mating pair fits best, you’re ready to use those dimension to create your project. Note that each time you use different material and a different router bit you should do test cuts before laying out your project.


