If you’re a CNC router user and want to get beyond cutting wood but are baffled by toolpaths, router bit selection, bit rpm and feed speed, we’re here for you. This article provides recipes for success that will take the guess work out of cuts in polycarbonate, brass, foam, cardboard and yes, wood.
If you’re not a CNC user (yet) but have wondered what the hype is all about, get ready to see some of the amazing capabilities that a CNC router can bring to your shop.
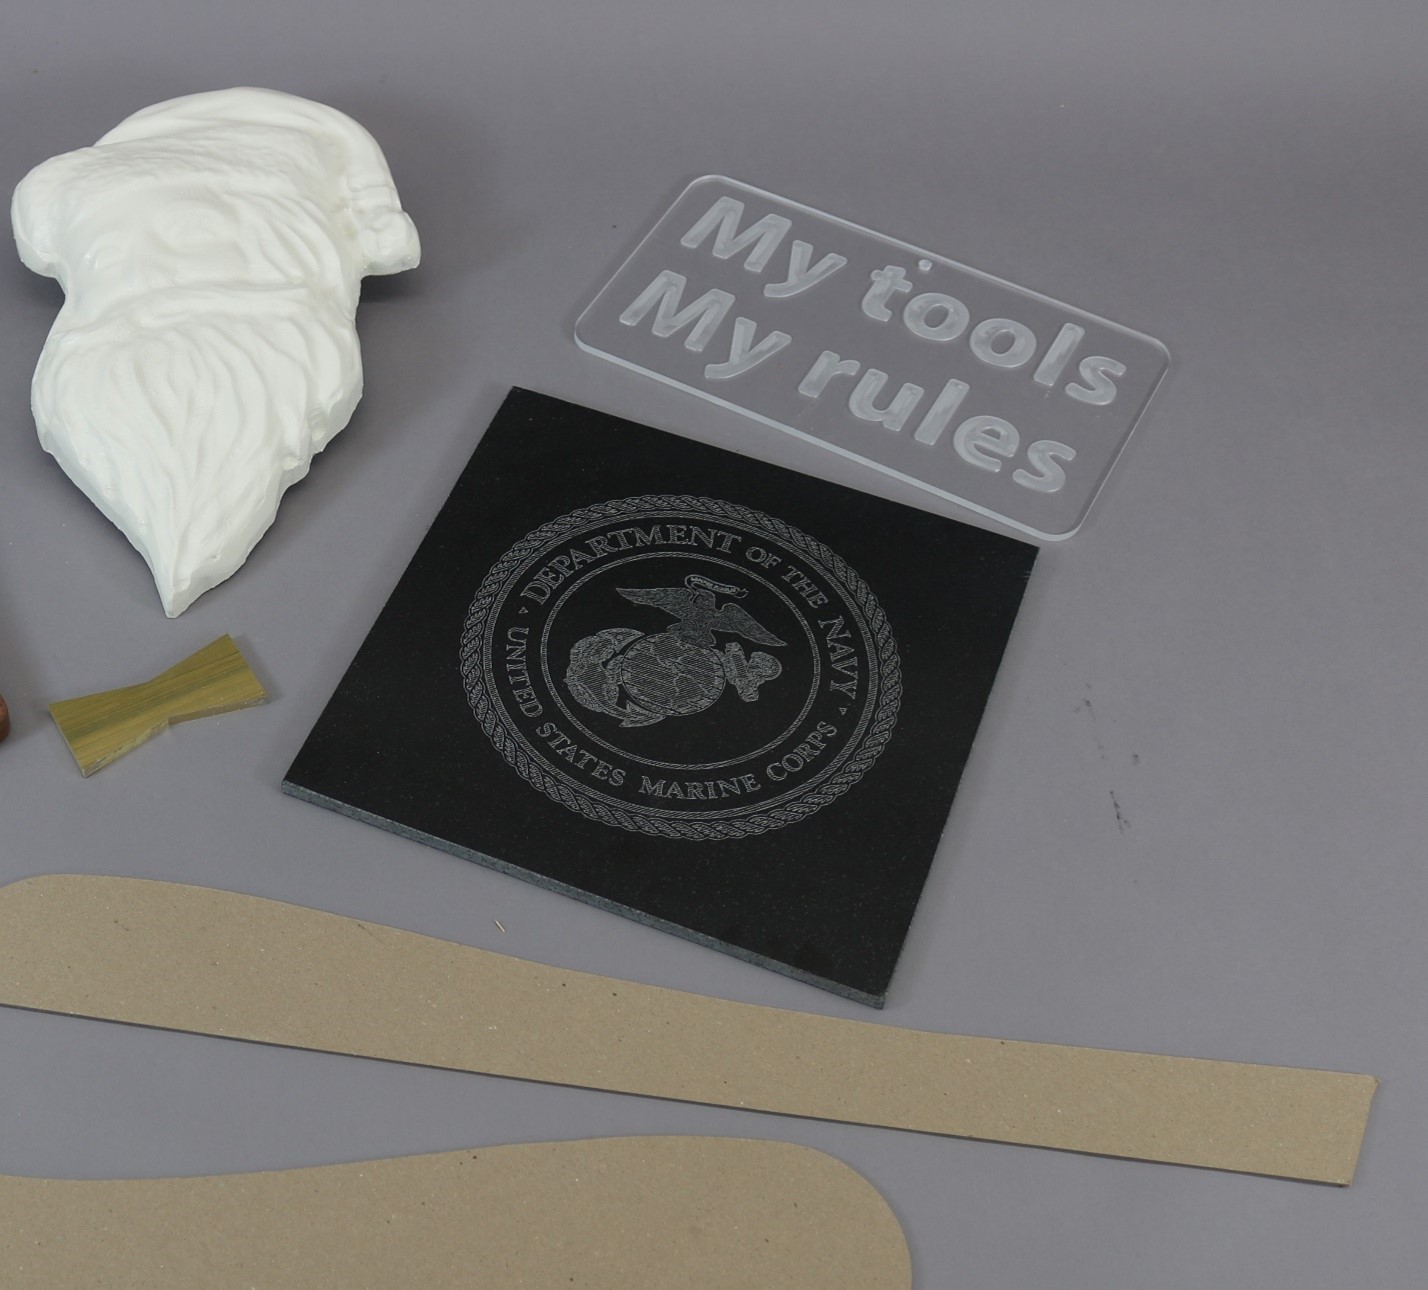
You gotta obey the speed limit
Regardless of what you’re cutting, running a CNC isn’t as simple as turning the machine on and letting it rip. You need to control the feed rate and rpm of the router to get the best results. You do this all the time with hand-held routers, probably without thinking about it. Hand-held routers constantly give you tactile feedback and you respond accordingly by changing your feed rate, or reducing the depth of cut, or changing the rpm, or all of the above. You can’t feel that feedback on a CNC router, so you need to tell the machine what to do. If you don’t you can quickly dull or break bits, and you’ll have lousy cut quality on your work. You’ll need to check the owner’s manual for your machine to learn how to set rpm and feed rate on your CNC router.
This article isn’t a comprehensive feed and speed guide, it’s a starting point. If you use other router bits or materials (such as aluminum instead of brass) you’ll need to experiment, and possibly change the parameters slightly. Good cut quality and router bit longevity are all about chip load; literally the size of the chip the router bit is making. If you’re seeing dust, not chips, your set up isn’t right. Chip load calculators can be found on the web, and router bit manufacturers should also be able to help you out. CNC routers react differently to cutting processes, some allowing faster feeds AND good cut quality, others demanding a lower feed rate. Another reason why you may need to make adjustments in your particular set up.
The designs and toolpaths used in this article were created in VCarve Pro, software commonly used with benchtop CNC machines.
You’ll find, in CNC work, that digital calipers are your friend. Although we say material is ¼”, ½”, ¾”…thick, it rarely is. You need to finitely measure material thickness to accurately set up toolpaths. On through cuts, set the depth of cut to go .020” beyond the material thickness. This gets the bit through the material without going excessively into your spoilboard.
360 Brass Bowtie


Toolpath:
Cutting non-ferrous metal requires very light cuts, so there are many passes.

Router bit: 1/8” Spiral “O” Single flute
RPM: 18,000
Feed speed: 40 in/min
Notes: 360 brass is a specific type of brass and is readily available. Notice the very light DOC, .027” per pass. In addition to controlling feed rate and rpm you need to be careful about DOC when machining non-ferrous metals. You’ll be able to use a similar set up to cut aluminum or copper, but there will slight changes depending on the material.
Cardboard Templates


Toolpath:
VCarve Pro has an on-board dragknife gadget. Although it’s built into the software, it shows up here as an imported toolpath. Using the gadget is the easiest way to get going with a dragknife.

Tool: Donek D4 Drag Knife
RPM: 0
Feed speed: 100 in/min
Notes: Turn your project drawings into templates. This tool comes with great set up instructions. The easiest way to create the toolpath within VCarve Pro is by using the Dragknife Toolpath Gadget. The knife will cut materials such as cardboard, styrene and vinyl letter material, up to 1/4" thick.
Polycarbonate


Toolpath-letters:
A light Cut Depth is more than sufficient for letters or artwork to show up in polycarbonate and can typically be done in one pass.

Tool: 1/4" Spiral “O” Single Flute, Plastic Cutting
RPM: 16,000
Feed speed: 70 in/min

Toolpath-hanger hole:
When you Retract above the cutting start depth the bit drills, raises, drills, raises… That’ll help keep the flutes clear on materials prone to sticking to the bit.
Cutter: 1/4" Spiral “O” Single Flute, Plastic Cutting
RPM: 16,000
Feed speed: N/A

Toolpath-exterior shape:
Choosing Do separate last pass will optimize the surface finish of the cut. The part will, in this case, be left .015” too large. The last pass skins off that small amount of material, easy peezy, so the cut quality is great.
Tool: Same
RPM: 16,000
Feed speed: 70 in/min
Notes: It’s common when making signs in polycarbonate to reverse the image and cut from the back. Doing a separate last pass on the exterior shape helps optimize cut quality.
Engraving Granite


Toolpath:
Lots of options for you to experiment with in the Engraving toolpath. Stepover controls how close the lines are within the engraving. A small number makes the lines close together and the final result more opaque. Hatch Angle is the angle the machine will make the lines at. I commonly use 45-degrees, but you should experiment to see what you like. Granite tiles are available at home centers.

Tool: Diamond Drag Engraving Bit
RPM: 0
Feed speed: 30 in/min
Notes: The Diamond Drag comes with excellent set up instructions. The tip is spring loaded. Increasing DOC applies more pressure, required for harder material. It may take some experimentation to get the best cut, depending on what material you’re working with. This tool can be used on plastic, glass, aluminum, brass and steel. Two tips are available. Use the 120-degree tip for engraving and the 90-degree tip for scoring glass so you can snap it on the score line.
Foam Insulation


Toolpath-3D roughing:
In most cases you’ll machine 3D artwork to the Model Boundary; literally the edges of the artwork. You might also choose to cut all the way to the edge of material (Material Boundary), or to a shape that you created (Selected Vectors)

Tool: 1/2” Spiral Upcut
RPM: 12,000
Feed speed: 100 in/min

Toolpath-3D finishing:
True ball nose bits are CNC specific and a must-have for small-scale 3D work. This 3D artwork is so large a ½” round nose works fine.

Tool: 1/2” Round Nose
RPM: 12,000
Feed speed: 100 in/min

Toolpath-exterior shape:
Use the Edit Passes function if you want to increase or decrease the number of passes.
Tool: 1/2” spiral upcut
RPM: 12,000
Feed speed: 100 in/min
Notes: Pink or blue foam insulation sold by home centers works great for this. Cut letters, decorations, or use it to prototype woodworking projects before cutting into that expensive wood. No need to buy specialized bits. Standard router bits will easily cut foam. Painting the final result? Be sure to use latex paint so you don’t melt the foam.