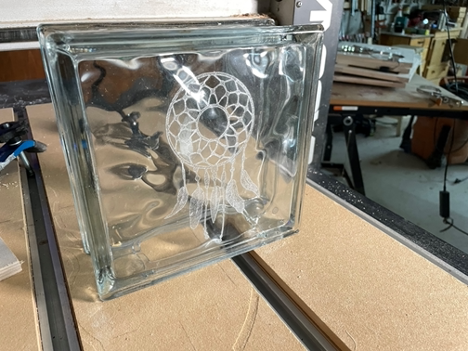
CNC routers aren’t just for cutting wood and plastics. You can also use your CNC to engrave, like the dream catcher artwork on this glass block

The key to this process is a diamond drag cutter. It’s a very cool bit. There’s a piece of diamond in the spring-loaded tip. The compression spring provides down pressure, and that’s what allows the diamond to etch the surface of the material.

In addition to glass the diamond drag can be used on granite, mirrors, brass, aluminum and more. This emblem was etched on a 12” x 12” granite tile purchased at Home Depot.
Design your project
VCarve Pro is being used for this project. The instructions that come with the diamond drag are very good. Use them to set up the parameters for your bit in the bit library.

Create a job and set the size of your project piece.

Bring in the clip art you want to use.

Use the Trace Bitmap tool to convert the clip art to vectors.

Resize the vectors as needed and position the artwork on your project.

Select the artwork (it should be magenta) and open the Quick Engraving toolpath.

Select the Diamond Drag from your bit library.

You can Fill the artwork, or choose to only Outline it. This aesthetic choice is just what it sounds like; tracing only the exterior, or completely infilling the artwork.
The Depth/Pressure, normally used for depth of cut, controls how much down pressure the spring-loaded tip will put on the surface. Again, the directions that come with the diamond drag will give you a good starting point. The harder the material, the more pressure required.
Stepover controls how close the etched lines are to each other. The smaller the number, the closer the lines, the more opacity you’ll have in your artwork.
Hatch Angle is the angle at which the lines (if you’re filling) will be etched.

Click Calculate to see how your engraving will look. This shows you the effect of Fill, and what it will look like with the Stepover you chose.

This is what it will look like if you choose Outline. Make changes as necessary.
Run the toolpath

Install the Diamond Drag in your CNC router. Be sure to set the spindle speed to zero, or turn the spindle off.

The easiest way to mark the center of a piece of glass for the X,Y origin is to put a piece of masking tape on the glass and mark the tape. This isn’t the type of glass block you’d use in a house as a window. This glass block is specifically for crafts, and can be filled. You can buy a fillable glass block on Amazon.

Secure the block to the spoilboard, locate the drag over the origin and zero the X and Y axes.

Even if you have a touch plate you can’t use it for the diamond drag because you won’t have electrical continuity. Instead, slowly lower the drag toward your work while sliding a piece of paper back and forth under it. When the drag touches the paper and you can’t slide it back and forth, zero the Z axis.

Run the toolpath.

Before removing the project from the CNC, check the results. If there isn’t enough definition, the drag didn’t etch deeply enough, you can run the toolpath again with no changes, or increase the depth/pressure for a deeper “cut” and run the toolpath again.

The benefit of fillable glass block is that you can fill it. Beads or marbles in the block increase the contrast and help make the engraving pop.


