Lithophanes are amazing! What is a lithophane? It’s an etched or carved piece that only shows an image when it’s back lit. In this case, the carving is done by a CNC router.
The material

1/4” thick solid surface countertop material, white or ivory, works great for this. Brand names include Avonite, Corian and Candlestone. Sourcing the material may be the most difficult part of this process. A good approach is to contact local cabinet shops and ask if they have offcuts you can purchase. 1/2" thick material is more common than 1/4". If that’s all you can get you can use your CNC to flycut it to 1/4", or pocket cut the image area to 1/4".
Software
Photo VCarve from Vectric makes creating lithophanes very easy. In addition to lithophanes you can use it to easily manage photos and machine them as beautiful artwork on your CNC router. The post processor for Laguna machines was not included with the software, but Vectric Customer Service (Support@vectric.com ) emailed it to me, and it was easy to add to Photo VCarve.
Creating the toolpaths

Open the software, click Load Image and navigate to the photo you want to use. The photo can be color or black and white.

This is the original image that was used for this project.

Click Set Material Size and set the image size (the size your photo will be cut at), the XY origin, the Z Zero, the thickness of your material and click Apply.

Click Set Cutting Parameters and choose the bit for the first pass, a roughing pass. On a small image like this a 1/8” ball nose works well for roughing. Take note of the settings. Depth of cut can vary from .08” to .1”. For the roughing pass Line Spacing is 50%. Since it’s roughing only, we’re not looking for great detail from this cut.
It’s important that the Line Angle is set to 45-degrees. This helps prevent bit breakage. Check the Invert light/dark areas box. This is very important as it’s what turns the image into a lithophane. Rapid clearance gap of .25 is good. Click Calculate.

You’ll see a preview of the roughing toolpath, and it won’t look like much. Since this is roughing only, we’re not asking for a lot of detail.

Click Preview and Save Toolpath, locate your post processor, and save the toolpath. You’ll most likely save it to a flash drive so you can take it to your CNC.

Navigate back to Set Cutting Parameters and choose the bit for the finish pass. A 1/16” ball nose provides excellent detail.

Change the Line Spacing to 15%. This brings the cuts closer together, with more overlap, to provide much better detail. The other settings remain the same. Click Calculate.

The preview of this toolpath has significantly more detail. Save the toolpath.
Routing your lithophane

Mount the material on your CNC with the 1/8” ballnose bit in the collet. Zero the X, Y and Z axes. Check out this article if you need help zeroing in on your origin location. Since we’re skinning the lithophane VERY thin, leaving approximately .040” of material in the thinnest sections, it’s important that your spoilboard is perfectly flat. If the material has a smooth face and rough face, mount it smooth face up.

Run the roughing toolpath.

The results of the roughing toolpath are pretty nondescript. Don’t worry. The detail comes with the next cut.

Mount the 1/16” ballnose in the collet and Z Zero to the top surface of the material.

Move the bit away from the material surface and manually lower it to the Z zero position.

From Z Zero, lower the bit an additional 2.5 mm, or .1”.

Set this as the new Z Zero. If you don’t do this step the finish toolpath will travel at exactly same elevation as the roughing pass, with no new cuts made.

Run the finish toolpath.

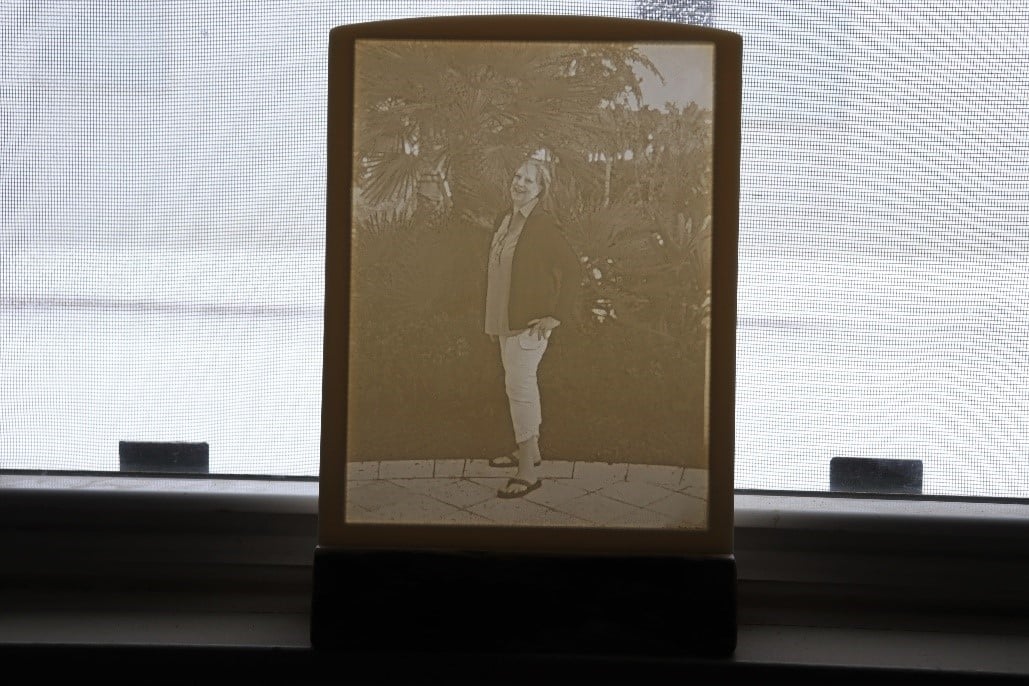
The resulting lithophane doesn’t look like much until…

…it’s backlit. You can simply place the completed lithophane in a window where the sun will light it (machined side facing you), or you can make a shadow box with a light source built into the box. Either way, the results have A LOT of wow factor, and people love seeing their pics converted to lithophanes.
Be aware that the finish toolpath typically takes a long time to run, quite possibly a number of hours. But the beauty of a CNC router is that you can push the go button and move on to other tasks while it’s working.


