Making signs on your CNC router? Incorporating relief cuts, so letters and objects are raised in the final piece, creates a very attractive look. We’ll look at an overview of the process here. Check out this companion video for complete how-to.
Design

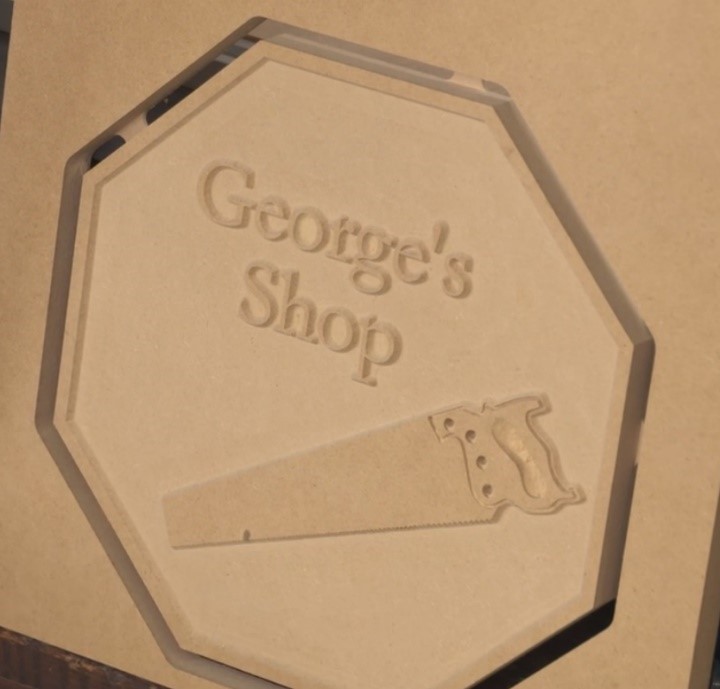
Use your design software to create your sign. I’m using VCarve Pro. The video provides details on each step; creating the octagons, importing and working with artwork, and creating and positioning the letters.

For the final project we want the letters and handsaw raised, with the inner octagon acting as the border. Before creating the toolpath select the inner octagon, the letters and the saw. Select multiple items by holding the Shift key down while clicking each item.
Toolpath

Use the VCarve toolpath to get the relief cut look. It’s common to use a v-bit for the final pass, leaving a slight bevel on all of the features. In this case we’re using a 60-degree v-bit.

Leaving the letters and artwork proud of the background means we’re removing LOTS of material from the background. Doing all of that with a 60-degree v-bit would be slow, and wouldn’t leave a very flat surface.
It’s better to use a clearance tool first to eliminate most of the waste, followed by the v-bit for details. A large diameter bit will get the waste out quickly, but leave more material for the v-bit to remove.
You need to find a balance, project by project, between the diameter of the clearance tool and the work remaining for the v-bit. I commonly use 3/8” or ¼” bits for the clearance step.

Previewing the toolpath is a very powerful way to confirm that you’ve doing the design and toolpath work correctly. It’s better to find errors here than on the CNC. You can double check the aesthetics, and the cuts.
For instance, is the relief cut deep enough to provide the contrast you’re looking for? Make any required changes.

Use the Profile Toolpath to cut the project to its final size. Cutting .020” beyond the thickness of your material is sufficient for through cuts. Because of this it’s very important to accurately measure the thickness of your material. Digital calipers are great for this. See Sources.

Incorporate tabs to prevent the project from being cut completely free of the surrounding waste wood. Tab size and location can be edited. Don’t place tabs on inside or outside corners. They’ll be cumbersome to deal with later.

Preview your Profile Toolpath. The bridges connecting the project to the surrounding waste are the tabs. Again, this is a great opportunity to make sure your toolpath work is right.

Use a Pocket Toolpath to create recesses and add definition to your project. Pockets are exactly what they sound like. They can be recesses with a distinct bottom, or holes that go all the way through your work.

Use Cut Depth to control how deep the cut will be. A large diameter bit will remove material quickly. A small diameter bit provides more detail. Similar to the VCarve Toolpath you can use a clearance tool to remove lots of waste, and wrap up with a smaller diameter bit for finer detail.

I’ve selected the internal line on the handle (selected items turn pink) and now we can add additional details to the project.

Use the Engraving Toolpath to cut on the line (Outline). Depth/Pressure controls how deeply the v-bit cuts.

As always, preview the toolpath to make sure you’re getting what you want. Save the toolpaths so you can run them on your CNC router.
Making the Cuts

Secure your work to the CNC bed. If your machine has T-track, aluminum hold downs provide a very easy method of holding your material. It’s important to use aluminum or wood hold downs, not steel, just in case you miscalculate and the router bit hits them.

Position the router bit over the XY origin marked on your work and zero the X and Y.

Zero the Z axis. The easiest way to do this is with a touch plate. When the spindle is lowered and the bit touches the plate, the CNC automatically knows where the surface of your work is.

Open your toolpaths. Make sure the toolpath you’re running matches the bit you’ve installed and zeroed in the spindle.

Run your toolpath.

Change bits as needed to complete the project’s toolpaths. With each bit change you need to zero the Z axis again, but you should not change the XY zero.

The completed sign looks great! Cut through the tabs using a bandsaw or handsaw, and sand them flush.
Items used
CNC Router Essentials A great book to help with your CNC router work


