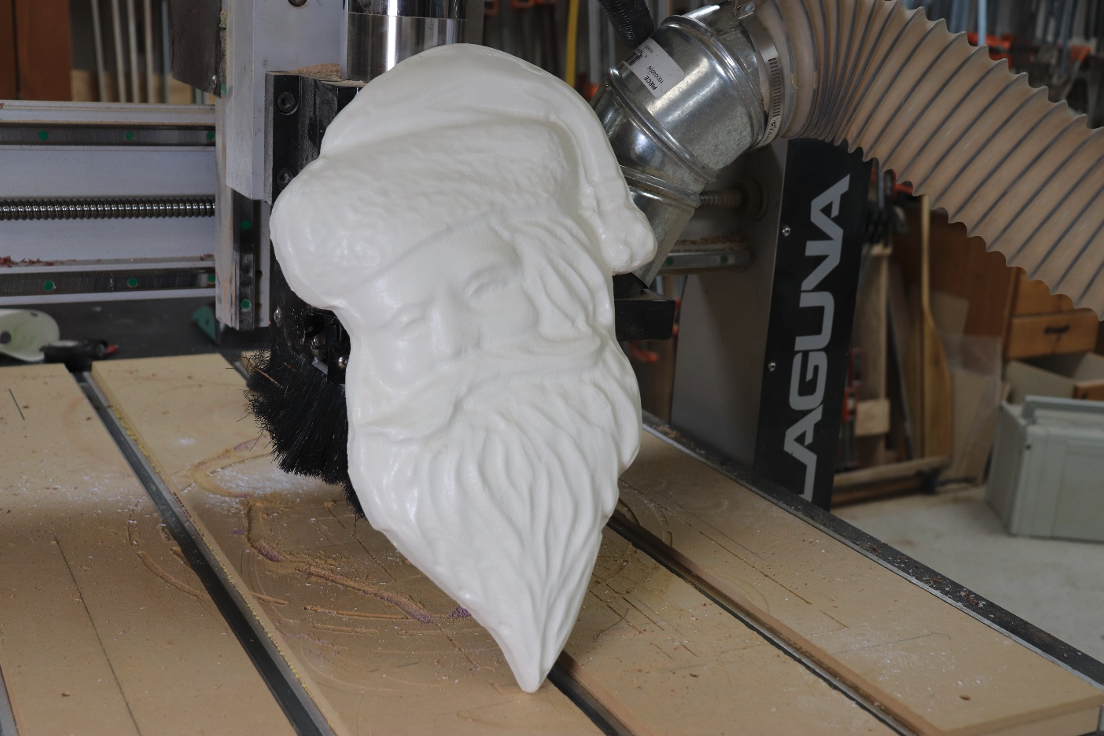
This is a fun project for Christmas, and it’s cool because it’s made out of standard building foam from a home center.

Yep, you can cut building foam just like this on your CNC router. It’s relatively inexpensive and, because it’s 2” thick, it’s a great choice for larger 3D object. Put on a coat of paint when you’re done, and no one know it’s foam. Use pink or blue building foam. It’s pretty dense, and cuts well.
Design and toolpaths
The design work is being done in VCarve Pro.

Create a new job in Job Setup.
If you don’t already have the Santa face clipart you can purchase it from Design and Make. It’s Santa Claus Head 3. There are also other Santa options. Import the clipart into your software.

Navigate to the Clipart tab. Click on it to open it.

Drag and drop Santa onto your workpiece.

Resize and position Santa as necessary.

Check Material Setup to make sure the artwork fits in your workpiece. Foam board is plenty thick for most clipart, so this shouldn’t be a problem.

Navigate to the Modeling tab and click on it.

Select the Santa clipart and then click on Create vector boundary around selected components.

This does just what it sounds like…it puts a boundary around the clipart. You don’t need the boundary to do the 3D cuts, but you do need a boundary if you want to cut the artwork from the workpiece with a Profile toolpath.

Select Santa and use the Rough Machining Toolpath to rough out the shape. For clipart as large as this is (10” x 16”) a 3/8” endmill is fine for roughing.

After selecting the bit click on the Edit button to edit the parameters for the bit. You have to be careful with foam to make sure you cut it, but don’t melt it. It’s best to slow the Feed Rate down. It’s been reduced to 60 inches per minute for this toolpath. Click OK, and then click Calculate.

Within the Finish Machining Toolpath select a ½” ballnose bit. Again, use Edit to reduce the Feed Rate to 60 ipm. Click Calculate.

Select the boundary line of the clipart and go to the 2D Profile Toolpath. Select the bit you’ll be using, set Cut Depth to go slightly deeper than the thickness of the material and use tabs and ramps. Click Calculate.

Use Preview Toolpaths to check your work. Make adjustments as necessary.
Cutting the project

Secure your foam to the CNC and install the correct router bit for the roughing toolpath. Zero the X, Y and Z axes and run the toolpath.

Swap to the correct router bit for the 3D finishing toolpath, rezero the Z axis and run the toolpath.

Swap bits one more time, rezero the Z axis, and run the profile toolpath to cut Santa to shape. Remove the foam from the CNC and cut the tabs.
Paint your project

The foam typically doesn’t need any sanding. If there are some rough spots lightly sand them with 220-grit sandpaper. Paint your project with latex paint. Don’t paint your foam projects with paint from aerosol cans. That paint typically melts the foam. That would make Santa very unhappy, and we don’t want Santa unhappy. :)


