The idea of doing an inlay in your woodworking projects isn’t new, but doing it using epoxy instead of wood as the inlay may be new to you. Here’s how you can make this happen on your next project.
Start with VCarve…
The software used for this article is VCarve Pro.

Create a new file using the dimensions of your project piece.

Add the clip art you want to use for your inlay. Use a Pocket Toolpath to create the recess you’ll pour the epoxy into. A 3/16” deep pocket is sufficient. A 1/16” ball nose bit is used for the final detailing, and a 1/8” endmill for the clearance cut. The clearance cut allows the work to go faster, and makes it easier for the 1/16” bit to do its work.
Notice that the veins of the leaf are selected along with the outline of the leaf. That means the pocket cut will leave the veins intact. You’ll see how that plays in later.

Use Preview Toolpaths to make sure you’re getting what you want from the cut. Make changes as needed.
Cut the Pocket

Install the clearance router bit and zero the X, Y and Z axes.

Run the clearance toolpath.

Install the detailing bit and rezero the Z axis.

Run the detail toolpath.
Prep for epoxy work

Spray dewaxed shellac into the pocket you just cut. This seals the raw wood and prevents color you add to the epoxy from leeching into the surround wood. If you don’t do this you might see little veins of color in the area surrounding the pocket.

Use hot glue to make a “berm” around the pocket. This prevents epoxy from running all over the surface of the project.
Mix and pour the epoxy

Mix the epoxy. Since the pocket is shallow you can use tabletop epoxy formulas for this. If you do a project with a deeper pocket be sure to double-check the epoxy to make sure it can be used for a deeper pour.

Add pigment to achieve your desired color.

Fill the pocket with epoxy. It’s a good idea to slightly overfill the pocket, taking advantage of the berm, to make sure the epoxy doesn’t end up below the surface of the wood.

Use a heat gun to remove bubbles from the epoxy.

You can see the value of the hot glue berm. It does a great job of keeping the epoxy from running everywhere. You can also use 100% silicone caulk to make the berm, but would have to allow it dry overnight before pouring the epoxy. The hot glue is ready to go as soon as it cools off.
Clean up

Use a sharp chisel to slice the hot glue berm off the surface of your project.

Use a random orbit sander to sand the epoxy flush with the wood. Start with 80-grit and progress to 220-grit.

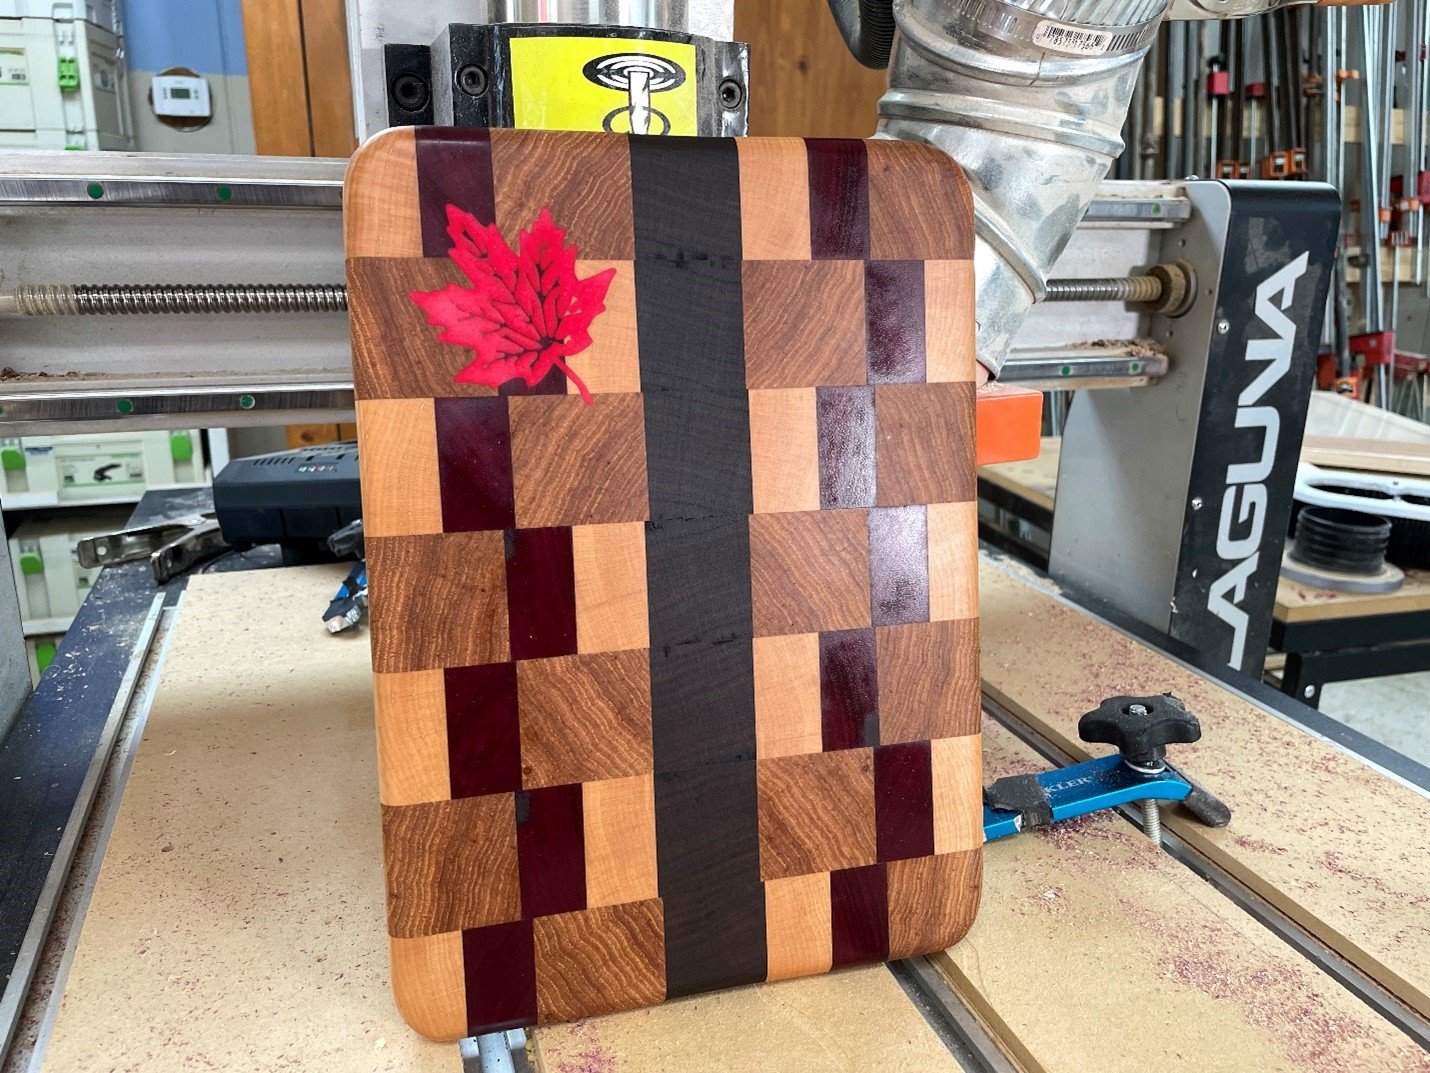
Sanding starts to reveal why the veins of the leaf were left in the center of pocket. They add a very nice level of detail.
Finishing

Mineral oil is an excellent finish for cutting boards. Soak the entire board and apply the finish right over the epoxy.

The final result is very striking.
If you like working with epoxy, or want to know more about how to use epoxy, check out these articles:
Make a Bowl With An Epoxy Accent
Level an Epoxy Pour on your CNC


