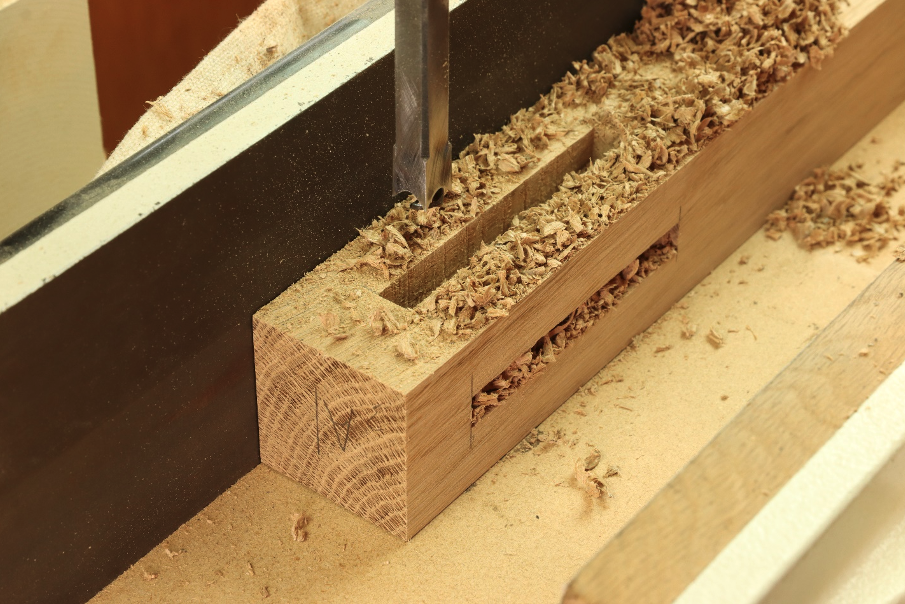
1. Mortise before Tenon
It’s the quintessential order of operations in woodworking, and it’s nearly always true. Usually, you’ll cut the mortise first, then size the tenon to fit. There are good reasons for this rule too. If you’re making the mortise with a hollow chisel mortiser or router, the bit will be a nominal size. If you’re using a 3/8” bit, it’s easier to cut a 3/8” wide mortise. Cutting the tenon on a table saw with a dado blade is much easier, rather than adjusting the tenon thickness to fit the mortise.
Are there exceptions to the rule? Sure, with some specialty routing jigs you can cut either mortise or tenon first, but as a general rule, it’s better to cut the mortise first. 
2. Joinery before Curves
When building complex projects with curves, angles, and tapers, it’s a good idea to make the square joinery cuts first. It’s a sinking feeling when you forget this rule and realize you’ve cut away the reference surface before the joinery is complete. Keep with the mantra that joinery comes before curves, specifically that “curves” refers to any shaped or angled cut that should only be made after the square tenons or dados have been milled. 
3. Spraying beats a Brush
Confidently lay down a professional quality finish with a sprayer. I’m surprised how many competent woodworkers still use a brush or rag to apply a topcoat. On a recent shop cabinet project, I thought I might apply shellac with a rag, just for old-times sake. After about 10 minutes, I realized how slow and tedious the process would be, so I got out the sprayer. A finely atomized finish requires you to work in a well-ventilated area and wear a respirator approved for organic vapors. However, the reward is a smooth finish that builds a protective layer in as little as two coats. You simply can’t beat the quality of a sprayed finish.
4. Sand before Assembly
Sanding of each component should be done before the final assembly. It seems obvious to say, but forgetting this important order of operation can result in more workload later on. Save yourself the headache and sand each part thoroughly before applying glue. 
5. Centered Groove
Milling a centered groove is a key skill for many projects. Whether you’re working on building cabinets, or just a piece of furniture with frame-and-panel construction, you’ll need to cut perfectly centered grooves. The easiest way to do this is to make two cuts, just off-center. Make one cut, then flip the board 180 degrees to make the second pass. This will widen the groove but still maintain a perfectly centered position. Repeat as needed until the groove fits the panel.
6. Cauls to the Rescue
Clamping cauls can be found in any large woodworking shop, but what are they? Cauls are simply thick boards with a slightly convex surface. The bowed shape ensures that pressure will be applied to the middle of the glued panel. Once the clamping pressure is applied, the cauls straighten out, resulting in a flat panel without misaligned parts or ridges. Tip: Use duct or packing tape on one side of the caul to prevent it from sticking to the project!

7. Account for wood Movement
When large panels are involved, it's always best to leave some room for wood to move. This walnut top will be attached with “figure 8” fasteners to allow for seasonal changes in humidity. The top panel will be free to expand and contract along its width, while still being anchored to the table base.
8. Start with a Detailed Plan
My grandfather was a shipyard draftsman, and I think I got his eye for detail somewhere along the line. While my father would sometimes draw a woodworking plan on a napkin, my grandfather knew that a detailed plan was best. Work out all your joinery and dimensions with a 3D rendering before committing to the actual project.

Now that you understand these key fundamentals, check out this leather-lined Cell Phone Organizer/Billfold Valet for your next weekend project, perfect gift for a loved one.
Willie Sandry is a Freelance Writer for several woodworking magazines, and enjoys designing and building furniture, and upholstering his own chairs. Check out his latest woodworking and upholstery projects on his YouTube channel The Thoughtful Woodworker.
Always make safety a priority in your shop. Wear safety glasses and personal protective equipment. Safety equipment may have been removed for demonstration purposes. Always use all appropriate safety equipment.


