A tapered cut may seem like a simple thing to do in the wood shop. After all, you may have made dovetail joints and other complicated joinery for furniture and cabinet projects before. However, have you ever wondered if you’re making angled and tapered cuts the best way possible? Let’s take a quick look at the four most common ways to cut a taper. We'll also review the pros and cons of each method.

Method 1. Bandsaw Freehand, Sand Smooth. When you're cutting a taper, your first thought might be to head to the bandsaw. Normally, that would be a good way to cut tapers. However, The disadvantage is the extensive time spent at the edge sander before doing your normal prep routine with a random orbit sander.

Method 2. Bandsaw Freehand, Joint the Edge Smooth. This method begins in the same position as the previous method. The only difference is using the jointer when it's time to clean up the cuts.

Set the depth of cut for a very light pass, and prepare to trim the bandsaw cut at the jointer. If you have an old-fashioned jointer with straight knives, you’ll need to pay particular attention to grain direction to minimize tear-out along the edge of the board. If you have a modern jointer like this JX|12 with ShearTec: II cutter head, you can all but disregard grain direction, and virtually eliminate tear outs. The advantage of this two-step tapering method is the ability to handle just about any size workpiece.
Click here to compare the different options in the JX line of jointers.

Method 3. Tapering Sled. One slick way to cut a taper is by using a tapering sled at the table saw. Since the edge of the sled is “zero clearance” with the blade, you simply align your pencil line to the edge of the jig. Clamp the workpiece in place, and make the tapered cut with a single operation. The benefit of this method is minimal cleanup work left behind. Just light sanding is all that’s required before you assemble your project. One disadvantage to a tapering sled is not being able to cut large parts with it.

Whether it's taper panels or legs for a decorative effect, a tapering sled is right for the job. Check out the blog here if you’d like to build this improved T-track tapering sled.

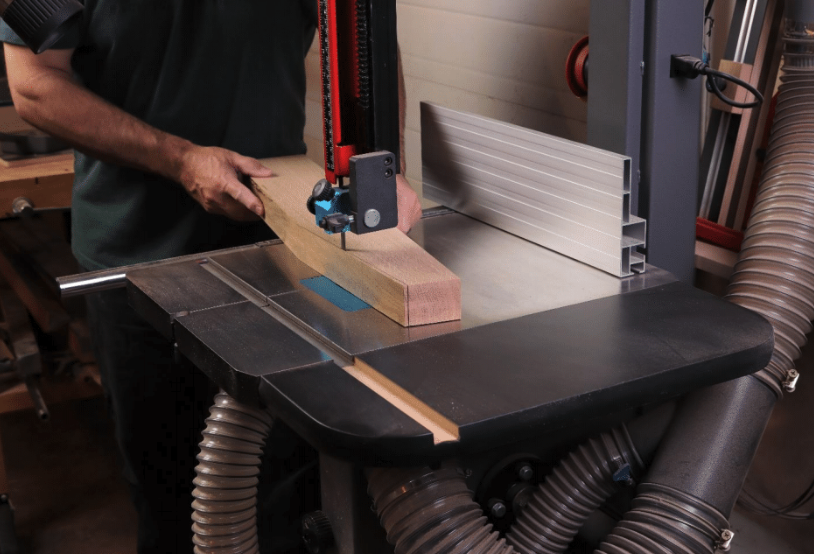
Method 4. Bandsaw with Template Cutting Jig, then Pattern Rout. Here’s one you may not have tried yet. It starts with a template attached to your workpiece using double-sided woodworking tape. Then use a special jig attached to the fence of your bandsaw to cut very close to the template. You can determine how much waste you leave behind by the position of your bandsaw fence. Notice the jig height is set to allow the walnut workpiece to pass under the jig. This lets the point of the jig maintain continuous contact with the template, for a consistent cut.

The bandsaw template cutting jig is easy to make and can be attached to your fence with T-track hardware. If you don’t have a T-track in your bandsaw fence, you can simply clamp the jig in place. Explore other bandsaws laguna has to offer here.

The final step with method 4 is to flush-trim the remaining waste at the router table. Luckily, you already have a template attached to your workpiece, so all you need to do is align the bearing on the router bit with the template. Since the bandsaw cut is consistent and close to your pencil line, this final trimming pass is easy to complete.
Give yourself multiple ways to handle taper cuts with the jigs and fixtures discussed here today. There won’t be a taper or angled cut you can’t handle in the shop!
Willie Sandry is a Freelance Writer, Tool Tester, Blogger, and Crafter in wood and leather. Check out all his projects and reviews on his YouTube channel The Thoughtful Woodworker here.


