If you have an existing piece of furniture and want to add additional pieces in the room to match, you’ll need to learn about matching finishes. Layering colors is an art; if you’re willing to experience some samples, you’ll usually find a near-perfect match.

Begin by, Assembling your new piece of furniture, and completing any sanding and final preparations before applying the finish. Here, I’m using a flush-trimming saw to cut off the dowel that’s cross-pegged this mortise and tenon joint.

Of course, you’ll have a much easier time sanding projects if you use the right tools. A professional planer with a helical cutter head will leave a smooth finish on all your furniture components. Plus, you won’t fight tear-outs in tricky lumber species like the white oak used for this ottoman project. Learn more about the new PX series planers Here.

Once all the prep work is done, you can start with the initial coloring step. I’m starting with a TransTint Brown Mahogany dye, mixed with one ounce per quart of thinner. I recommend mixing dyes with a special non-grain-raising (NGR) solution, which is just a 50/50 mixture of denatured alcohol and lacquer thinner. It dries very quickly at room temperature, so you need to move quickly when applying the dye with a staining sponge.

Next, give the project a quick seal with shellac. Since the shellac and the dye you just applied are alcohol-based, this should be a very light coat. This will prevent any dark streaks in the finish where the shellac runs or drips. Once this dries, give it a scuff sanding with a 600-800 grit soft sanding sponge.

Wipe on a gel stain. Known as a “glaze” when applied over a finish, gel stain is a great product for layering the color for a perfect match. Prepared sample boards will tell you which combination of products to use in order to match your existing furniture. This general formula works well for creating rich finishes in a variety of tones.

I selected a General Finishes Candlelight gel stain. As you can see, it goes on like thick yogurt and looks dark brown in color. As you wipe it back with a rag, you start to see the intended reddish-brown color.

Spray the topcoat. I selected lacquer for the topcoat and began by spraying the underside of the ottoman. I only spray the inside surfaces from this position. I like to leave the outside of the legs dry for now, so I can easily flip the ottoman over to finish spraying. Always use a true respirator (not a dust mask) approved for organic vapors whenever you spray. Even if the product claims to be “water-based” or “water cleanup”, you must use a respirator. Work in a well-ventilated area, with at least two sources of fresh air and two exhaust fans.

Then flip the footstool over and set it on the painter's pyramids to finish the first coat. I also like to use a furniture turntable or “Lazy Susan” to easily position the project while spraying. Make a quick bandsaw circle-cutting jig. For more information on making a spraying turntable of your own, click Here.

The second coat of lacquer proceeds just like the first. Of course, you’ll scuff sand the finish between coats, and clean off any dust with a cheesecloth. But for the final coat, I like to do something different. Once the second and final coat dries, I’ll gently wet sand it with a spray bottle of water and a 1200-1500 grit soft sanding sponge. The second coat should be pretty smooth after spraying, but this final wet sanding step will draw comments from anyone who touches it. You’ll quickly have a satin smooth finish, ready to put on display in your front room.

It’s almost a shame to cover up the curved rails with leather upholstery, but that’s what the design calls for. This multi-step finish is great on figured hardwood, like this quarter-sawn white oak. It seems to bring out the character of the wood and yields a genuine antique look. In my testing, this formula is a perfect match for Stickley's “Onandaga” finish. Of course, lumber species makes a big difference, so refer to your sample boards before committing to a finishing schedule for your completed project.

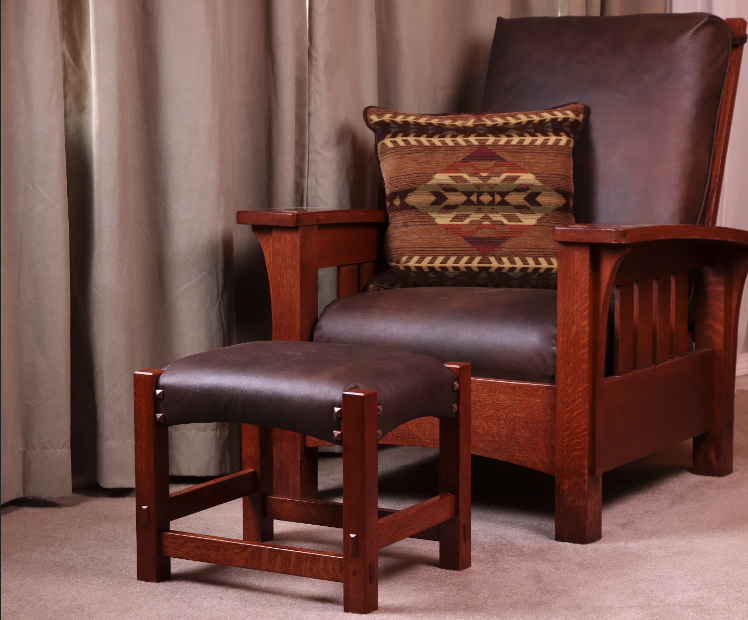
With fresh leather upholstery and pyramid deco tacks, this project is ready to come into the house and be enjoyed for years to come. I’m pleased with the color match next to this genuine Stickley bow arm Morris chair and with matching upholstery, it looks like it came straight from the factory!
The biggest thing is not being afraid to try something new. Whether that’s woodworking, or maybe upholstery, just educate yourself and give it a try. You’ll be amazed at what you can do with a little practice.
Willie Sandry is a Freelance Writer for several woodworking magazines, a tool tester, blogger, and crafter in wood and leather. For more details on woodworking, spray finishing and even leather upholstery, check out his YouTube channel The Thoughtful Woodworker… https://www.youtube.com/c/TheThoughtfulWoodworker


