To Watch The Full Step-By-Step Video On How To Make A Magnetic Knife Holder, CLICK HERE
Solid Walnut and Maple. A magnetic knife holder is a great kitchen accessory, and this version is different from most designs I’ve seen. Follow along to see how to make this countertop knife holder using the F2 Fusion Tablesaw.

Angle the Wide Block. Start with two 8/4 walnut blocks, both about 12” long. One block needs to be 6” wide, and the other is 4-1/4” wide. Both blocks should be planed to a finished thickness of 1-3/4.” Then use a miter gauge and a pair of trigger clamps to secure the 6” wide block. Proceed by cutting one end at a 15-degree angle.

Bevel the Narrow Block. Now bevel the tablesaw blade to 15 degrees, and trim one end of the 4-1/4” wide walnut block. Then hold the two parts together, as they’ll be situated in the finished knife holder, and mark the taller block height. Finally, return the blade to 90 degrees, and trim one block so the two blocks are flush on top.

Bar Magnets. Make a routing template from ½” thick MDF, with a 2-1/2” x 9/16” rectangle cut. This size template will fit 60mm x 10mm bar magnets. Secure the template to a walnut block, and route three shallow recesses for the bar magnets. Repeat this process on the other walnut blank.

Guide Bushing Follows Template. Use a guide bushing designed for inlays, and remove the brass spacer ring. The 1/8” diameter carbide router bit that comes with the inlay bushing kit cuts the perfect size corners for the bar magnets.

Dado Notches. Install a dado stack on the tablesaw, and cut ¾” wide x ¼” deep notches in the blocks. Each block gets 3 notches space ¾” from the top of the block, and 2” apart. Make sure to reference the top of the blank against the rip fence, and cut both blocks at each fence setting. This way the notches will align perfectly when you install the maple “ribs.”

Epoxy the Bar Magnets. Quick-set epoxy makes a great way to mount recessed magnets. Mix the epoxy thoroughly, and apply a small amount in each recess with a cotton swab. Once installed, the magnets should be slightly recessed from the surface of the wood. This way, there’s no metal-to-metal contact with the knives.

Glue it Up. Glue the walnut blocks together. When working with walnut, I'd recommend using Titebond II glue, as it dries to medium brown color.

Flush Them Up. Make sure the blocks are flush on the top edge as you clamp them together. This is important for the alignment of the dado notches, and will ensure everything fits together in the remaining steps.

Make the Ribs. Mill strips of maple ¾” wide x ½” deep, and 7” long. Miter one end of each strip, to achieve the correct final length of 6-1/2”. Then simply glue the miters together with small clamping squares. A strip of blue painter’s tape keeps the miter joint nice and tight as the glue cures.

Splining Jig Rides Tablesaw Fence. Clamp the rib assembly into a splining jig, and create a single kerf slot in the miter joint. Click Here to see how to create your own spline jig.


Blade Height. Set the blade height to penetrate nearly through the entire miter joint. Once a spline is added, this will increase the joint strength of these small miters.

Insert Splines. Glue splines into the single kerf slot. At this point, the ribs are still loose from the project and just resting in their dado notches.

Trim the Splines Flush. Here, a template-trimming jig is attached to the bandsaw fence to trim the splines close to the line. Make sure you aren't damaging the maple part. Click Here to see how to make your own Bandsaw Cutting Jig.


Round Magnets Too. Drill for four round magnets in each rib, and epoxy them just like the bar magnets. Sand the rib components, and chamfer the exposed ends for a decorative look. By carefully aligning the grain of the walnut sapwood, it almost looks like the grain from the two blocks is continuous.

Install Completed Ribs. Finally, glue the rib components into the dado notches. Once the glue dries, apply a wipe-on Danish oil to enhance the natural beauty of the wood.

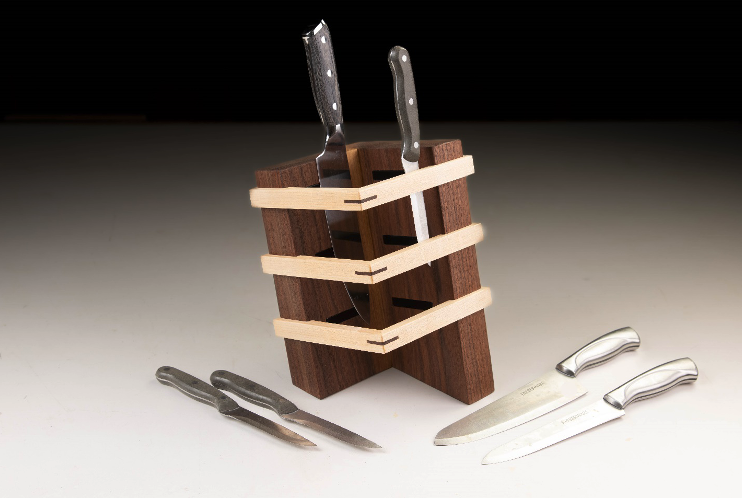
High Style. Overall, it makes a clever and attractive way to corral your kitchen knives. Try this fun woodworking project this weekend using the F2 Fusion Tablesaw.
Willie Sandry is a Freelance Writer for several woodworking magazines, a tool tester, blogger & crafter in wood and leather. Find more project inspiration and special techniques on his YouTube channel The Thoughtful Woodworker… https://www.youtube.com/c/TheThoughtfulWoodworker


