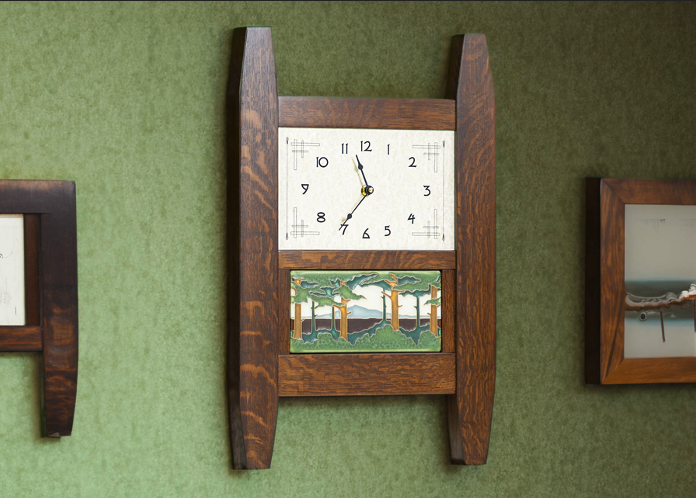
Make Time for This Great Project. Make yourself a handsome wall clock, or build it as a thoughtful gift. Either way, this slim wall-mounted clock adds a touch of style to the home. The project is sized for a 4 x 8” Motawi tile, but you can use any tile or decoration you like. The clock face and internals are from Schlabaugh and Sons, and the dimensions are listed at the end of the blog. The frame of the clock features simple mortise and tenon construction. Note that the stiles (vertical boards) are a full 1” thick, while the rails are 7/8” thick, which creates a nice shadow line at the front.

Get Ripping! Rip the parts to width and size them according to the materials list. A 40-50 tooth thin kerf blade is ideal for this general-purpose work. Notice the true riving knife installed on the F2 Fusion tablesaw, which is a great safety feature to avoid binding and kickback. Keep the riving knife on your saw with most standard cuts.

Time for Tenons. Cut three mortises in each stile, then install a full dado stack on the tablesaw, and use a sacrificial fence and miter gauge to make ½” long tenons. The finished tenons are 3/8” thick to fit the mortises.
Pro Tip! A sacrificial fence is one of the most frequently used tablesaw accessories in any busy shop. Be prepared with the proper clamps to secure it to the rip fence, whenever you’re making tenons shorter than the width of your dado stack. Make your own sacrificial fence by following the blog HERE.

Slender Middle Rail. The middle rail is only 15/16” wide x 7/8” thick, and as a result, the small tenon is slightly offset. Start with a ¼” blade height, and cut the sides and top shoulder. Then raise the blade to 5/16” for the bottom side, so the tenon becomes 3/8” square.

A Frame in No Time. The bottom rail is 2” wide, while the top rail is 1-1/2” wide. If you study Arts and Crafts furniture, you may notice the width of the parts vary, typically with wider parts located at the bottom. It’s a subtle detail, but gives an overall pleasing appearance to the final product.

Time’s a Wasting. Head over to the bandsaw to cut graceful tapers on the top and bottom of both stiles. These straight cuts remove 3/8” of material across a distance of 3”. A ½” resaw blade makes quick work of these cuts. Explore our Resaw King Blades by clicking HERE.

How Long Can You Suffer with a Cheap Bandsaw Blade? Some people think a resaw blade is only for slicing thick boards into thin veneers. In reality, a ½” carbide-tipped Resaw King is my daily blade in the wood shop. It handles any straight cut or tapers with ease, as well as gentle curves.

Explore the Laguna Bandsaw Collection HERE.
Tic Tock. Or maybe time’s run out on your pre-war bandsaw, and you’re ready for an upgrade. The 1412 is a popular choice, and handles bandsaw blades up to ¾” wide. My favorite features are the rack and pinion height adjustment and quick-release blade tension lever. Choose a 115” length blade for this model.


A Quick Rabbet. Now cut a rabbet for the ¼” plywood panel that will support the decorative tile. Just like the slot-cutting bit, the bearing sets the width of this ¼” wide cut. The clock frame is face-up for this operation.

Keyhole Slots. Finally, chuck a keyhole bit into the router table, and cut a slot in each stile. Make sure to plunge the bit at the lower end of the slot, and route a distance of 5/8” toward the top of the stile.

Pre-finish the Parts. Since it would be nearly impossible to keep dye and stain off the clock face, be sure to pre-finish the components of the clock. You’ll need spacer strips to flank the decorative tile as well, so don’t forget to cut and finish those at the same time. Use painter’s tape to keep finish off the tenons and joinery. Then simply slide the clock face into its groove, and permanently assemble the frame.

Secure the Tile. 100% silicone sealant works great to secure the tile to the plywood backer. A few small dabs will do the job.
Did You Know? Large granite slabs found in kitchens are often secured with nothing more than 100% silicone sealant. It’s strong stuff! Be sure to avoid eye contact, as uncured silicone is an extreme eye irritant.

Install the Tile, and This Project is Almost Done. With the plywood backer glued and held in place with clamps, press the tile onto the silicone adhesive. Then center the tile by adding pre-finished spacer strips on each side. The spacer strips are simply attached to the backer board with wood glue.

Well, It’s 5:00 Somewhere. Once the glue dries, you can call this project done and enjoy a cold drink. The maple plywood backer board has been curved to fit the radius of the rabbet (You could certainly square the rabbet instead if you prefer). The thick stiles and offset groove for the clock face give the required 5/8” depth for the clock mechanism. Modern clock internals are silent, and this one runs on a single AA battery. See the materials list for hardware details.


