Did you know you can cut finger joints on your CNC router? Here’s what you need to know to make this joint.
Why finger joints?
Why would you use a finger joint? They’re incredibly strong. The fingers create lots of surface area, so there’s a boat load of room for glue. Finger joints also look cool. Seeing end grain adjacent to face grain looks good, and looks REALLY good when you have contrasting woods.
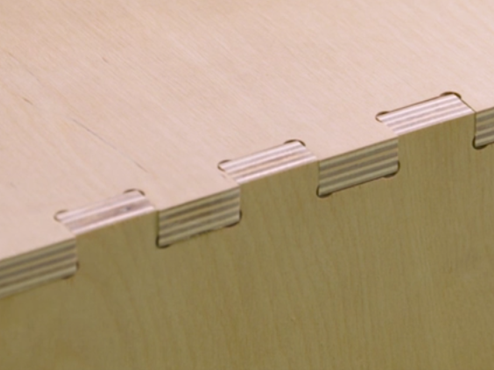
A dose of reality with finger joints on a CNC: In this article we’re cutting the material with it flat on the spoilboard so can’t produce a square inside corner so. If you look closely at the joint, we’re left with a fillet. More on that later.
Measure the endmill

To create a joint that’s a good fit we need to know the EXACT diameter of the end mill that will be used to cut the joint. You can’t get this measurement with a tape measure. The best tool for this job is a pair of digital calipers.
Even if the bit is brand new, measure it. Definitely measure bits that have been sharpened. Use the same calipers to precisely measure the thickness of the material. ½” Baltic Birch plywood is being used here.
Create the design

Create a new file and set up the job dimensions. These are the dimensions of the piece you’re starting with. The software being used here is VCarve Pro.

Use the Draw Rectangle tool to create a square or rectangle that is the final size of your box side.

Use the Draw Rectangle tool again to start laying out the fingers. The width, X, of the rectangle is equal to the width of the fingers in the joint. This should be a dimension that’s an even increment of the width of your board.
For instance, the width of this board is 10”, so we’re creating five 1” wide fingers and five 1” wide recesses. A 4-1/2” wide board might have three ¾” wide fingers and three ¾” wide recesses.
The height of the rectangle should be slightly more than the thickness of your stock, .010”.

Use Align Objects to position the small rectangle. You must choose the objects in the right order for this to work. Select the small rectangle first, then hold the Shift key and select the large one.

Click Align Left and Align Top. This moves the small rectangle to the upper left corner.

Use Array Copy to evenly space the small rectangle across the end of the workpiece. The number of Columns is equal to the number of fingers you’ll end up with in the joint.
The Gap is equal to the width of the fingers. For test cuts you can use two fingers per board.

Click on the Create Fillets icon. Set the Tool Radius to half the diameter of the endmill you’re using. Use a Dog-Bone Fillet and click on the inside corner of each rectangle.

Use Interactive Vector Trim to take away lines, leaving your finger joint behind. Be sure the Rejoin box is checked.
Create the toolpath

Click on the shape to select it. Use the 2D Profile Toolpath, set the Cut Depth to .020” more than the material thickness and choose the end mill you’ll be using: ¼” upcut spiral in this case.

Click Edit to open the dialog box that allows you to customize the cut for the bit you’re using. Enter the actual diameter of your bit and click OK. This is extremely important to do any time you’re asking for high precision from your CNC.

Select Do Separate Last Pass, Add tabs to toolpath and Add ramps to toolpath. Click Calculate.
Do a test cut
Save the toolpath and run two pieces on your CNC. Don’t cut your project pieces until you’ve checked the fit.

Check your work. The joint should slip together with gentle taps from a mallet. Once together there should be enough friction that the parts stay together if you’re holding on to only one piece.
Make corrections in the toolpath if the joint is too loose or too tight.

Change the fit of the joint by opening the 2D Profile Toolpath and using the Allowance Offset. You can enter a positive number or negative number.
Using a positive number moves the toolpath away from the line. This leaves the parts larger and creates a tighter joint. Using a negative number creates a looser joint. In most cases a small offset number will work to correct the fit of the joint.
Keep in mind that the Allowance offset is applied to the entire profile cut, which means the overall outside dimensions of the part will also change slightly.
Once you know you have a good fit, you’re ready to cut your project parts.

Glue the joint together and sand the end grain flush to the face grain. Leave the fillets as a void, or create an interesting look by filling the fillets with a contrasting color wood dough.


