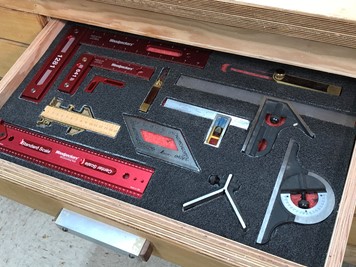
If you like to have a place for everything and everything in its place, you’re going to love Kaizen foam. It’s easy to work with and provides a padded “nest” for your tools to live in.

Kaizen foam is a multi-layered medium-density foam with distinct 1/8” thick layers. The layers are stuck together, but in a way that allows you to peel away as many or as few layers as you want. That allows you to create pockets of varying depth, depending on the item you’re making the pocket for.
Dimensions and pricing
The Kaizen foam shown here was purchased from FastCap. It’s available in black and red, black and white, black and gold and black and yellow. Sheets are 7/8”, 1-1/8” or 2-1/4” thick, 2’ x 4’. 1-1/8” thick foam is being used in this article.
A single sheet of 1-1/8” thick foam costs $43. Don’t panic. The way to buy this stuff is in a bundle. A bundle of eight sheets comes in at $19.37/sheet, and shipping is free. Don’t think you need eight sheets? Find someone to split the order with you.
What else you need
A few specialized items will help you work with Kaizen foam.

FastCap sells a long nose marker, $7, that simplifies tracing your tools. You also need a Kaizen Foam Knife, $4. The knife projects quite a bit from the handle so you can cut deeply into the foam, and the narrow blade gives you the agility you need to cut complex shapes.

These items are helpful, but optional. The Kaizen Foam Scraper, top, $11, and the Kaizen Foam Spinner, bottom, $5, will help you level out the bottom of the pocket.
Get started

Cut the foam to size so it fits in the drawer, or wherever you plan on using it. You can do that with any utility knife. Experiment with different layouts on the foam.

Once you have the layout right trace your tools using the long nose marker. Silver shows up well on the black surface.

The benefit of the long nose marker is its 1-1/2” of reach. This allows you to trace items that are standing away from the foam, like this plane handle.
Make the pockets

Cut along the line, staying on the inside edge of the 1/8” wide line. It doesn’t matter how deep you go since you can control the pocket depth by peeling back a lot of layers, or only a few.

Since the handle of the plane is away from the edge of the sole, it needs its own outline cut. This allows you to peel more layers away from the deep area, the sole, and fewer layers away from shallow area, the handle. You have to eyeball this on each tool and make the necessary cuts to create divisions for depth.

Work your finger under the foam layers and start peeling. You can always take out more layers, but you can’t put them back, so be conservative. Once you make a few pockets you’ll have a feel for how many layers need to come out for each tool, and individual sections of a tool.

Once you’ve worked the edges of the layers loosea you can be a little more aggressive and pull on larger pieces.

This provides the first round of layer removal for the bulk of the hand plane. Notice that the bottom is fairly rough. This isn’t big deal, but you may not like it aesthetically.

Use the Kaizen Foam Scraper if you want the bottom closer to dead flat. It’s similar to a rasp or Surform.

The Kaizen Foam Spinners are used in a drill. It’s there, red on red, look closely. The spinners are very handy for finitely separating the layers, especially if you don’t have long fingernails you can pick at the foam with.

Peel away the layers in the shallower portions of the pocket.

Test the fit. You may need to tweak it a little to get the tool to next perfectly. Peel out more layers as needed.

The first couple pockets you do might be a little frustrating, but you’ll get the hang of it quickly. A friendly warning….this is an addictive form of tool storage. In addition to tools, you may soon be using it for photo gear, electronics…. Maybe you need all eight sheets in the bundle after all.


