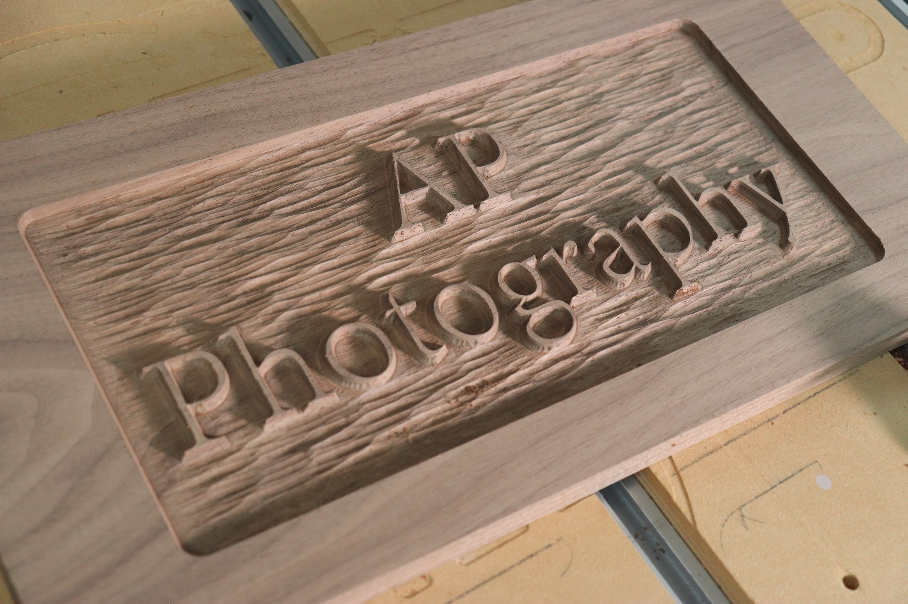
Creating a raised letter sign with a textured background is an easy tasks to do when using V-Carve Pro and your CNC router. Not only does the textured background look great, but it also makes your life easier because it eliminates a lot of sanding.
No matter how carefully you set up your work, no matter how sharp the clearance cutter is when you cut the background, there will be milling marks left behind. Sanding the flat area surrounding the letters to remove the marks is very tedious, and nearly impossible to do such that it stays perfectly flat. However, if you texture the background, you don’t need to do any sanding.
Make Your Design

Start a new job with the dimensions of your workpiece.
Create your design. The letters will be raised from the background, with the rectangle serving as the border. Check out this article for more info on working with this style of lettering.
Toolpath
Select your artwork and navigate to the VCarve toolpath.
Select the bits you’ll be using to create the letters and relieve the background. In this case, a 3/8” end mill worked well for the background, and a 45-degree V-bit worked great on the letters. We need to know the Flat Depth for a future step. Click Calculate and preview the toolpath.
Texture The Background
An important step needs to be taken for the texturing to work correctly.
Select the border and the letters and navigate to the Texturing Toolpath.
Select your bit and set the Start Depth. This is the same as the Flat Depth set previously. This tells the software to start the cuts at the level of the background, not on the surface of the material.
You can use any bit you like for texture. Ball nose cutters and V-bits are very common choices. This is a spot where Preview Toolpaths become extremely powerful. Change bit styles, change the parameters of the texture, and preview the results. You can make a design decision before you make sawdust.
There are many variables within the Texturing Toolpath. Use the numbers I have here as a starting point, but experiment with these settings and look at different results. Click Calculate.

Use Preview Toolpaths to check your work. What? That doesn’t look so great. The ball's nose bit washed out the letters.
The software runs toolpaths based on the center of the cutter. So, when we run the toolpath as was shown in these steps the bit comes too far across the letters and eliminates a lot of the letter profile.
Reopen the Texturing Toolpath and look for the Boundary Vector Offset. Enter the radius of the ball nose bit. This is telling the software to keep the tip of the bit that distance away from the vectors that define the letters and border. Click Calculate. This is an important step.
Check your work using Preview Toolpaths. You should now have distinct letters and a distinct border.
border. You’ll still need to use the Boundary Vector Offset setting on a V-bit. A setting of 1/8” on a V-but is a good starting point, but experiment with different settings and previews before cutting your project.
Make your project

Secure your work to the CNC spoil board, zero the X, Y, and Z axes, and run the clearance toolpath.
.
Change to the V-bit and zero the Z axis to the surface of the board. Run the lettering toolpath.
Swap to the ball nose bit and zero the Z to the surface of the board. Run the texturing toolpath.
Sanding and Finishing

A mop sander works very well on projects like this. Each finger is an abrasive strip, and it’s easy to wrap them around the letters and against the texture.
Use the mop sander like a buffing wheel, working it against the letters and on the textured background. Don’t over do it, or you’ll lose the crisp edges. When you’re happy with the look, apply a coat of finish, and your sign is ready.


