Make this decorative splined box with only one power tool – a tablesaw! This figured maple keepsake box features an aromatic cedar bottom, and walnut splines for that added special touch.

Safety equipment has been removed for demonstration purposes. Always use appropriate safety equipment.
Mill some stock to size for the splined box project, which in this case is some nice figured maple. The board has been ripped to 5” wide, and planed to 5/8” thick. Now angle the tablesaw blade to 45 degrees and use a miter gauge to cut the corners. The finished workpieces are 5-1/4” long “tip-to-tip.” A stop block clamped to the auxiliary fence of a miter gauge helps with repeatable accuracy.

Reassemble the boards for continuous grain pattern, and label them accordingly. If they’re installed this way in the box, you’ll have grain that appears to wrap right around the mitered corners.

Mark the bottom edge for a groove that will accept the aromatic cedar bottom panel. The marks don’t have to be accurate, because you’re just generally indicating where the groove is located.

Install a full-kerf combination blade on the tablesaw. Combination blades usually have 40-50 teeth and at least some flat-top raker style teeth. This tooth geometry and full-kerf style blade is preferred when cutting grooves, because it makes a flat-bottom groove. A high ATB blade without raker teeth will leave ridges in the groove.

Set the rip fence 3/8” from the blade and make a first pass on all four workpieces. Then adjust the fence for a second pass to widen the groove. Repeat as necessary until the plywood bottom panel slides into the groove.

Now trim the plywood bottom to fit the box you made. I like to use aromatic cedar plywood to add a decorative look to boxes and drawers.

Here’s where the project gets fun! Use masking tape to align the mitered edges of the boards. Press the tape firmly in place to keep the joints in position as you glue it together.

Almost like magic. With the joints securely taped, you can add the plywood bottom, and fold the box together. If you sized the plywood correctly, you’ll have no problem getting four perfect miter joints. Go ahead and glue the project together and tape off the final miter. Go easy on the glue, especially near the inside faces, to avoid squeeze-out that might be difficult to remove from the inside of the box. Adding splines in the next step will add a measure of strength to these simple miter joints.

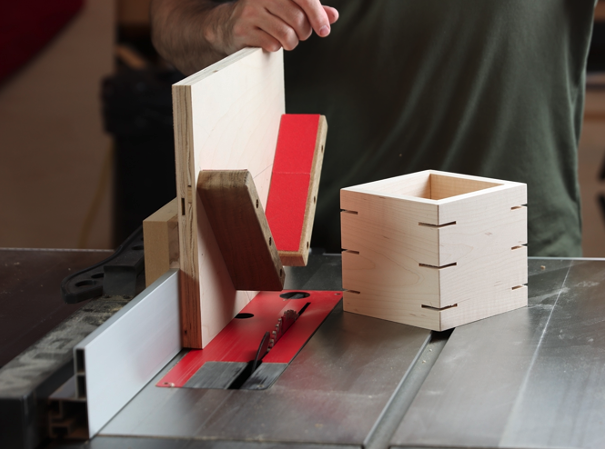
Set the blade height to stay just below the inside corner of the box. The splines will be much easier to finish if they’re only visible on the outside of the box.

Use a custom splining jig to cradle the box and cut accurate slots. The rip fence sets the location of the slots. Check out this short video on How to Build Your Own Splining Jig for a Fusion Tablesaw!

The end result is a decorative keepsake box with reinforced miter joints. Give this splining technique a try with your own custom tablesaw jig!
Or if you deserve a new tablesaw, check out the updated Fusion lineup with dual cursor fence and bevel angle DRO (available on Fusion F2 and F3 models) visit here: https://bit.ly/3AeH1KW
Willie Sandry is a Freelance Writer, Blogger, and Crafter in Wood and Leather. Check out his latest projects, jigs and techniques in woodworking magazines or on his YouTube channel The Thoughtful Woodworker https://www.youtube.com/c/TheThoughtfulWoodworker


