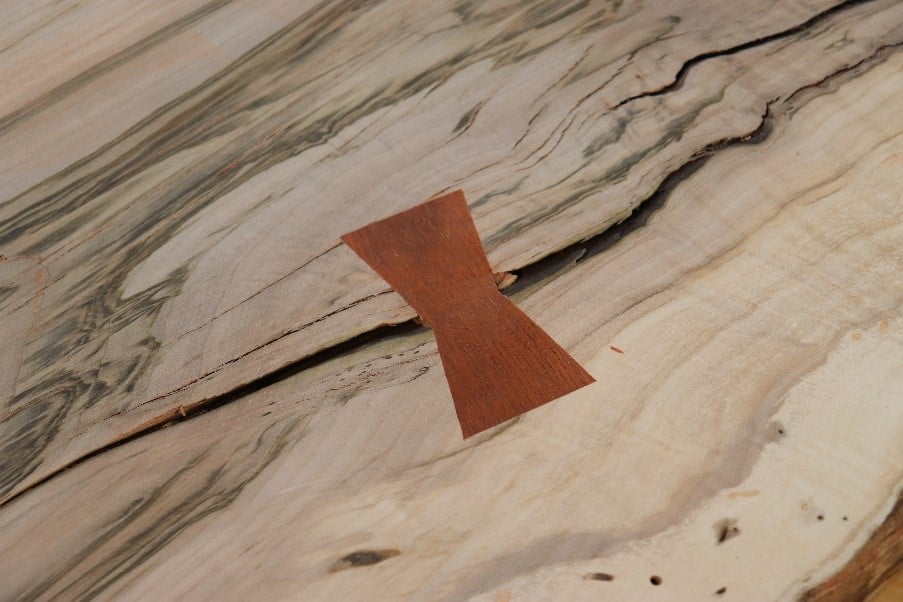
Bowties (also called butterflies) provide a great way to stabilize cracks. Creating your bowties from scratch allows you to make them any size you need and, unlike some commercial bowtie templates, you end up with sharp outside corners.
Lay out some samples
Here are some rules of the road for making bowties:
- The bowtie should be 1/3 as thick as the board you’re cutting it into
- Make the bowtie twice as long as its width at its widest point
- Cut the dovetail angle at 12-degrees
Before making wooden bowties, make paper bowties to help you determine what size bowties your project needs, and how many you need.

Cut a piece of scrap at 12-degrees to use as an angle template.

Lay out a rectangle the defines the outside dimension of the bowtie. This one is 2” x 4”.

Use the 12-degree cut to draw a line from each corner toward the center of the rectangle. 12-degrees is a time-tested angle that makes a great bowtie/dovetail shape, with the angle being neither too steep or too shallow.

This provides the bowtie shape. Make a bunch of bowties of varying dimensions.

Lay the paper bowties on your slab to determine how many you need, how large to make them and where to locate them.

Keep in mind that you can use more than one bowtie to span a crack, and they don’t have to all be the same size. Some people call this zippered bowties.
Create a bowtie

Lay out the bowtie to the size you need and cut it to shape use a bandsaw, jig saw or handsaw. Cut outside the line.

Secure the bowtie in a vise and use a sharp chisel to pare the edges down to the layout lines. Take light passes. Be careful to keep the edges of the bowtie perpendicular to its face. Work downhill from the wide portion of the bowtie to the narrow waist.

Use the edge of the chisel or a straight edge to check the bowtie and make sure the edges are straight.
Trace the bowtie

Secure the bowtie in place with double-faced tape.

Trace the outline of the bowtie using a marking knife. A marking knife provides the most accurate and distinct line, which is important to achieve a good fit.

If you do use a pencil to trace the bowtie keep the tip of the pencil needle sharp by rolling it over 220-grit sandpaper.

The bowtie shape has now been transferred to your material.
Rout the pocket

Install a 1/4" bit in your router and set the depth of cut to slightly less than the thickness of the bowtie.

Drill a starter hole in the center of the bowtie pocket. The diameter of the drill bit should be slightly more than the diameter of the router bit. Use masking tape to set the depth of the hole on the drill bit.

The pocket is routed freehand. Maintain control of the router by resting the heels of your hands on the work surface and controlling the router’s position with your fingers.

Cut as close to the line as you can, without cutting into it or going past it. If you do go outside the line make a slightly larger bowtie, retrace the bowtie and recut the pocket.

Check your work. Make sure the bottom of the pocket is flat and the cuts are consistently close to the layout lines.
Chisel the pocket

Use a sharp chisel to pare the edges of the pocket to the layout line. Be careful to keep the edges perpendicular to the face of the slab.

It’ll be easier to slip the bowtie into the pocket if you chamfer the back corners. Because the bowtie was hand cut and pared it probably doesn’t have a uniform shape, so will only fit into the pocket the exact way it was traced. Make sure you’re chamfering only the back corners.

Test the fit frequently. Tap the bowtie in, but don’t tap it in too far or you won’t be able to remove it.
Install the bowtie

When you have a good fit brush glue on the bottom of the pocket.

Tap the bowtie in, using a piece of scrap to protect the bowtie from mallet strikes.

Sand the bowtie flush after the glue is dry, apply finish and admire your work.


