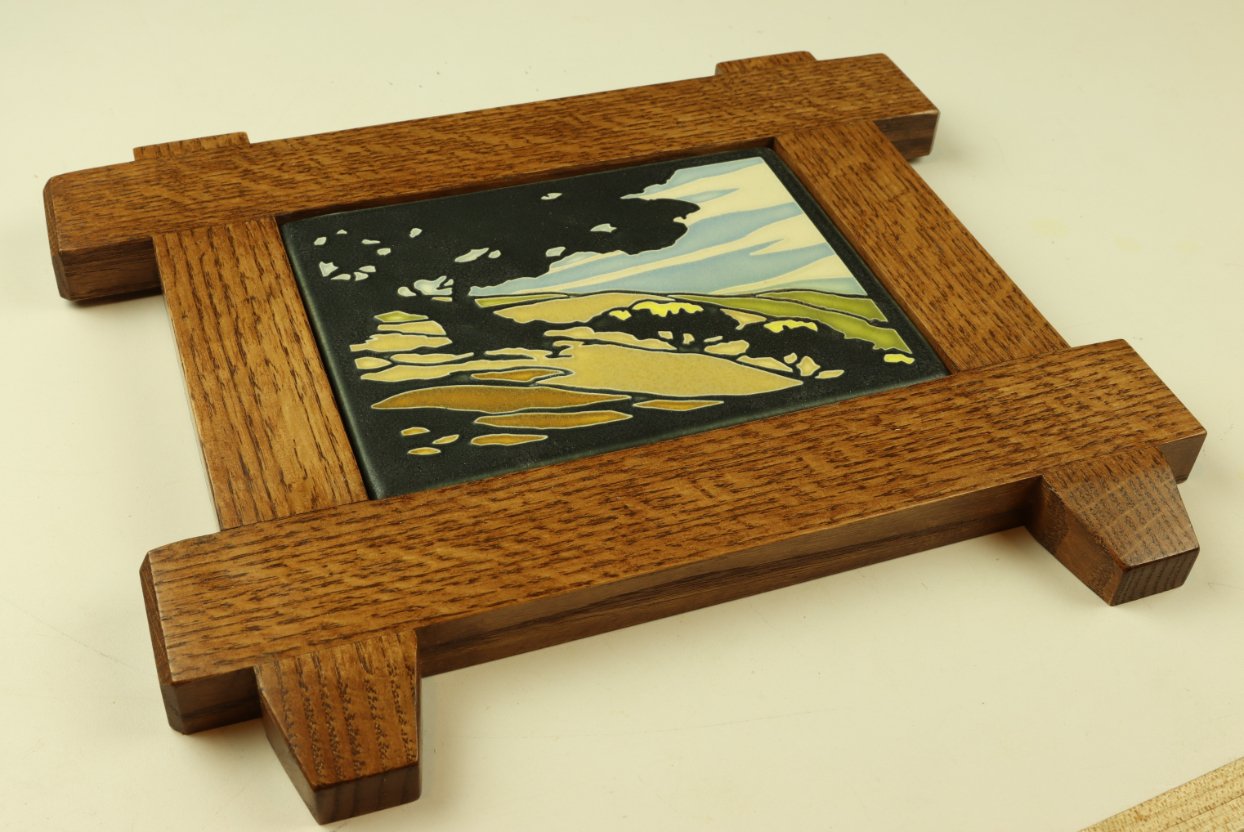
Make this handsome art tile frame with just a tablesaw and a bandsaw. The main corner joints are half-lap joints made with a dado blade, and the frame is sized for a 6x8” tile that’s about 5/8” thick. It’s a fun, easy project that you can knock out in a weekend!

Start by ripping parts to size at the tablesaw. A 40-tooth general purpose blade works well for both rips and crosscuts. Since the art tile is 5/8” thick, I’m using 7/8” thick stock to allow for a plywood backer to support the tile.

Crosscut the top and bottom rails to the same length. We’ll end up shortening the bottom rail later, but making them the same length for now will help with the half-lap joinery.
The top and bottom rails are 2” wide, while the vertical stiles are 1-3/4” wide. Size the length of the components based on your actual tile size.

Use scraps milled to the same thickness as your workpieces to set the dado blade height. When sample half-lap joints slide together on a flat reference surface, you know you have the blade height set correctly.

Start the half-lap joints with a single pass from a ¾” dado stack. Using the rip fence and miter gauge together is only acceptable for non-through cuts such as this. Once you make this cut on both ends on the top and bottom rails, go ahead and reset the rip fence for the second cut.

The second cut will establish the fit of the half-lap joint, so start conservatively. Then clean up the waste in the middle so you can bring the stile into position. Given the option, I’d always prefer to use the actual workpiece to check the fit of a joint, rather than a tape measure.

Once the stiles fit into the dado, go ahead and repeat this cut on both ends of the top and bottom rails.

Now that the joinery is taken care of, trim ½” of length from both ends of the lower rail. This is purely aesthetic, but gives an interesting look with the bottom rail shorter that the top rail.

Now mark out the tapered shape on the bottom of the stiles, and head over to the bandsaw. Trim about ¼” of width from each side to form the tapered shape.

Now turn the stile on edge to complete the 3-sided taper. This makes a pyramid shape at the bottom of the frame for an interesting detail.

Sand chamfers on the ends of the parts as desired. It’s helpful to draw a pencil line, and sand to the line for consistent results.

Sand the edges of all parts, and glue the frame together. Sanding the face of the frame can wait until after the glue dries.

Clamp the frame together, and set it aside to dry for several hours. Luckily, half-lap joints are self-aligning and self-squaring so assembly is a breeze.

Rout a rabbet on the back edge of the frame to receive a ¼” plywood backer. I used a bearing guided rabbeting bit at the router table, then over to the bench to square up the corners with a chisel.

Cut a piece of ¼” plywood to fit in the rabbet, but don’t glue it in place yet. You’ll want to apply any stain or finish of your choice first.
TIP: Use blue painter’s tape to cover the rabbet as you apply the finish. This will allow a good glue bond between the frame and plywood.

Once the finish is applied, go ahead and glue the backer board in place. Once the glue dries, install keyhole hangers on the back of the frame. This is a sturdy option for hanging frames, and helps prevent unwanted movement of the tile frame on the wall.

Add several dabs of 100% silicone to adhere the tile to the backer board.
Note: Trace around the inside perimeter of the frame with a black Sharpie marker. That way you won’t see any of the light-colored plywood behind the dark rim of the art tile.

Drop the tile in place over the silicone adhesive, and let it dry for 24 hours in a warm area. I’ve mounted tiles like this before, and I’ve never had one fail. Actually, I pity the poor soul that ever tried to remove it.

Now the frame is complete, and ready to showcase in a special place in your home. If wall-mounting isn’t your thing, you could easily convert this project to an easel style frame for display on a shelf or mantel.
Willie Sandry is a Freelance Writer for woodworking magazines, blogger, crafter in wood and leather, and YouTube creator. Find woodworking inspiration on his channel the Thoughtful Woodworker… https://www.youtube.com/c/TheThoughtfulWoodworker
Or check out all Willie’s latest blogs, along with other great contributors here… https://info.lagunatools.com/