
I’ve been using a simple box joint jig for the last 10 years. Calling my old jig simple is an understatement – it was just two scraps of plywood screwed to a miter gauge. I’ve wanted a micro-adjustable box joint jig (AKA Finger Joint Jig) for some time now, so I decided to build one for my Laguna Fusion F2 tablesaw. Instead of screwing the jig to a miter gauge, I decided to build a dedicated jig base with runners that fit perfectly into the miter slots of my saw. This way, I can use the miter gauge for other tasks, and won’t have to reset the jig each time I used it. Just drop it in the slots of your saw and go to work.
Read all the details here, and see the jig in action on a Fusion F2 Saw here!

While certainly more involved than my previous jig, I wouldn’t call this jig elaborate. I always aim to make feature-rich jigs that are a joy to use, but aren’t so complicated that they take all weekend to build. You’ll need three strips of ¾” plywood, a couple hardwood runners, a pair of knobs (from Woodpeckers in this case), 5/16” x 2-1/2 T-bolts, and a few small parts that we’ll talk about soon.
Size the Base piece 18” long x 3” wide.
The Fixed Fence piece is 18” long x 5” wide.
The Sliding Fence piece is 17” long x 4-1/4” wide.
The runners are 12” long x ¾” wide x 3/8” thick (size to slide in your miter slots).

Speaking of elaborate (and expensive!) you should see my collection of router-based box joint jigs and accessories. Over the years, I think I’ve tried them all and while they certainly work, there’s something attractive about the simplicity of a tablesaw-based jig.

Take the sliding fence component over to the router table, and chuck a ½” bit in the router. Create shallow slots for the T-bolt heads by moving the board between stop blocks on your router table fence.

While maintaining the same fence and stop block settings, switch to a 5/16” plunging bit to complete the slots.

Now for the Stop Block. Prepare an extra-long blank of hardwood from 1-3/4” wide stock that’s been planed to the same thickness as your plywood. Next, drill a 3/8” diameter hole all the way through. Once the hole is drilled, you can safely trim the stop block to the finished length of 4-1/4”.

Stop Block Hardware. Thread a ¼”x 20 threaded insert into the hole, which will receive a length of threaded rod. I actually used the threaded rod from a common toggle clamp, which has a hard rubber tip. If you can’t find a toggle clamp component like this, a 3” long ¼” x 20 bolt will work just as well. The final bits are a pair of knurled thumb nuts which I sourced from Woodpecker’s. Really any ¼ x 20 tool-free nut should work, so long as it’s narrower than ¾” across the face.

Predrill and counterbore the stop block for pocket-hole style mounting screws. Install the threaded rod into the insert, with knurled nuts on either side to lock it in position.

Glue the fixed fence to the base piece. This will form the main carriage of the jig. After the glue cures, reinforce this butt joint with four square-drive screws. Just make sure to keep the screws clear of the eventual dado cut path. At some point, you’ll also need to drill 5/16” holes in the fixed fence for the T-bolts.

Cut a 3/8” slot in the sliding fence with a dado blade and miter gauge. Then glue in a hardwood key to fit. The key is about 1-3/4” long, and 7/16” tall. I don’t normally do box joints on stock thinner than ½”, so this works well for me. If you want to make box joints with 3/8” thick stock for instance, you would install a key slightly less than 3/8” tall.

Install the Runners. Use a spacer to offset the dado blade 3/8” from the key you installed. The spacer is just a length of hardwood you milled to make the key itself. Now, with the spacer clamped to the key, align it with the teeth of the dado blade. Use super glue to temporarily attach the runners to the sled (note: insert washers or coins into miter slots to raise the runners slightly). Once the super glue sets, turn the sled over and permanently attach the runners with screws through pre-drilled and countersunk holes from underneath.

Onboard Spacer Storage. Use the 3/8” dado blade to cut a kerf into the top of the fixed fence. This handy little groove lets you stow the spacer between uses. I thought of this idea when building my original jig, and found it quite a handy feature to have.

The micro-adjustable stop block installs with a pair of 1-1/4” long square drive screws. If you need to make fine adjustments in the fit of your box joints, just loosen the knurled nuts and advance or retract the threaded rod as needed.
Alternately, you can loosen the red knobs and use an automotive style feeler gauge to make the adjustment.

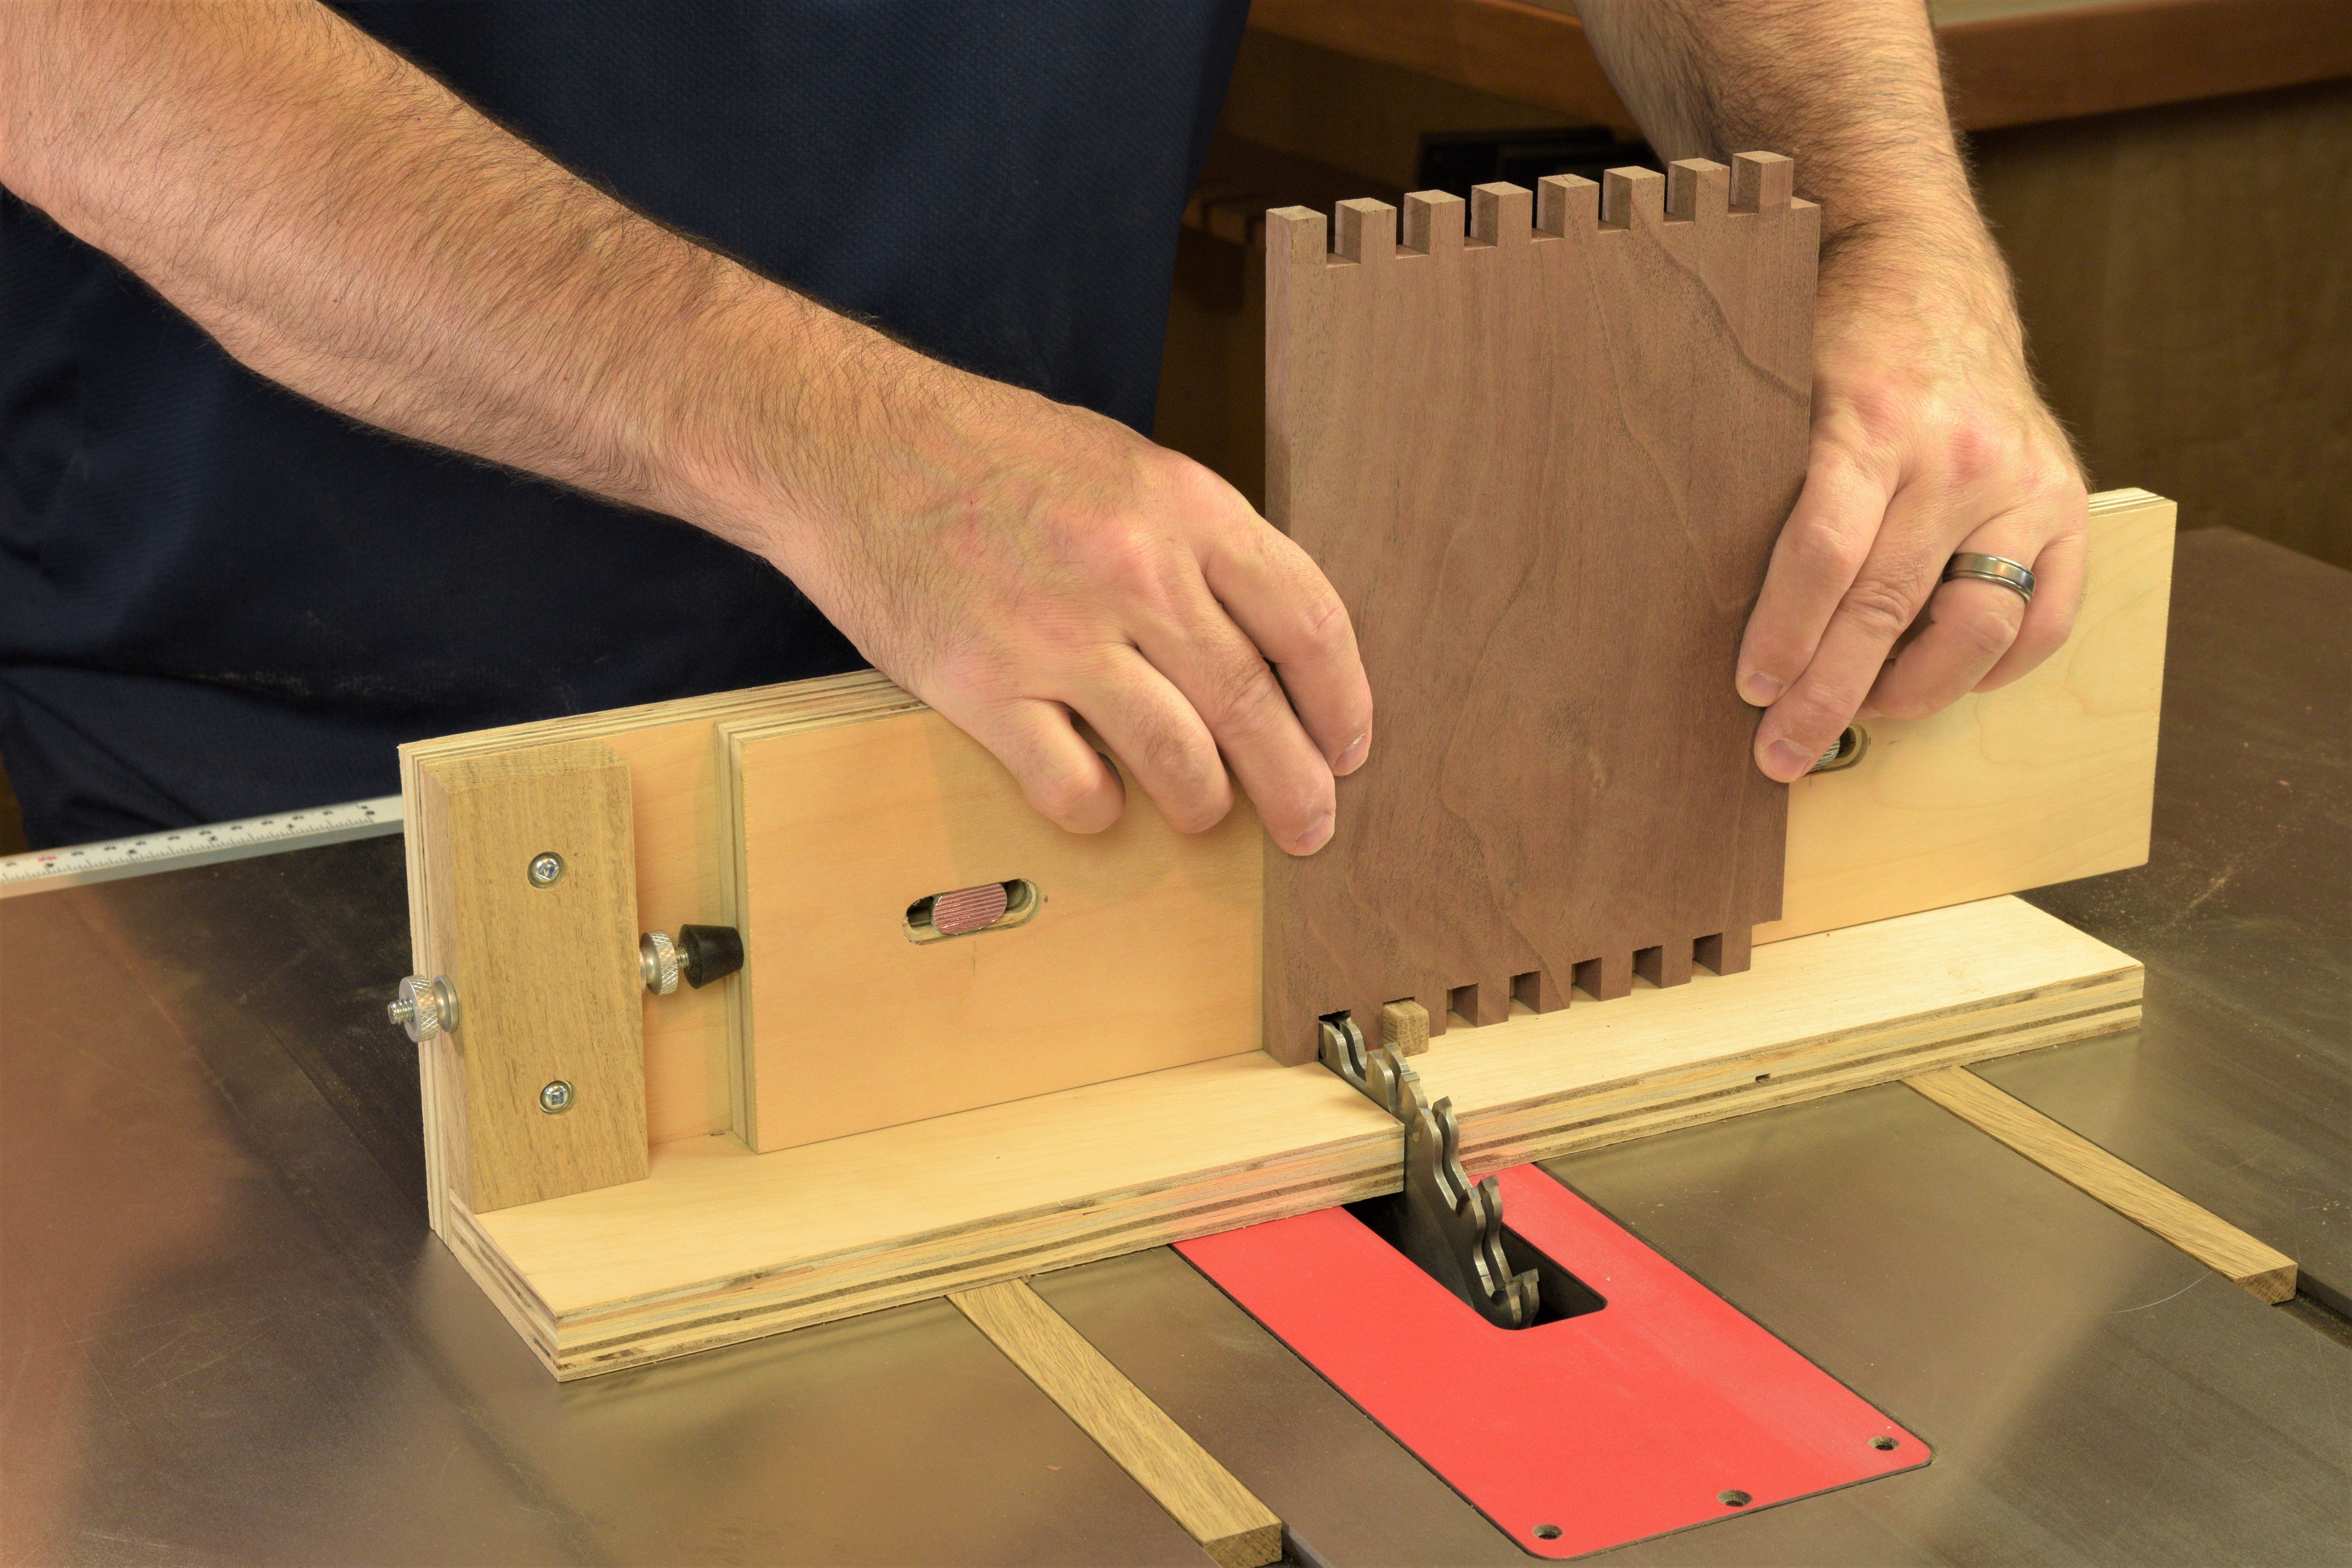
Make a row of cuts on the first board, then flip it around to act as a spacer for the second board. Clamp the second board in place as you remove the first board. Cut the initial corner notch in this position, and advance the board for each new cut.
The workpieces should index easily over the key. If the key is too tight in the slot, it’s okay to sand the key a little to ease the fit.

If the fit is too tight, adjust to the right. If the pins don’t fit into the socket, you need to adjust the jig to cut slightly smaller pins. Loosen the knurled nuts and back out the threaded rod slightly to adjust the key closer to the blade. It’s a great adjustment mechanism, but truth be told… if you set up the jig correctly with your spacer… you’ll never need to adjust it!

Perfect fit on the first try! Here I have my dado blade set for an extra-deep cut for dramatic effect, but typically you’ll set the dado to cut just slightly deeper than the workpiece. So with just a few dollars worth of hardware and some scraps from the bin, you’ll have a box joint jig to rival the fanciest router jig on the market. By all accounts this will become your new favorite jig in the shop!
Check out a short video of this Box Joint Jig in use on the Laguna Fusion F2 Tablesaw!


