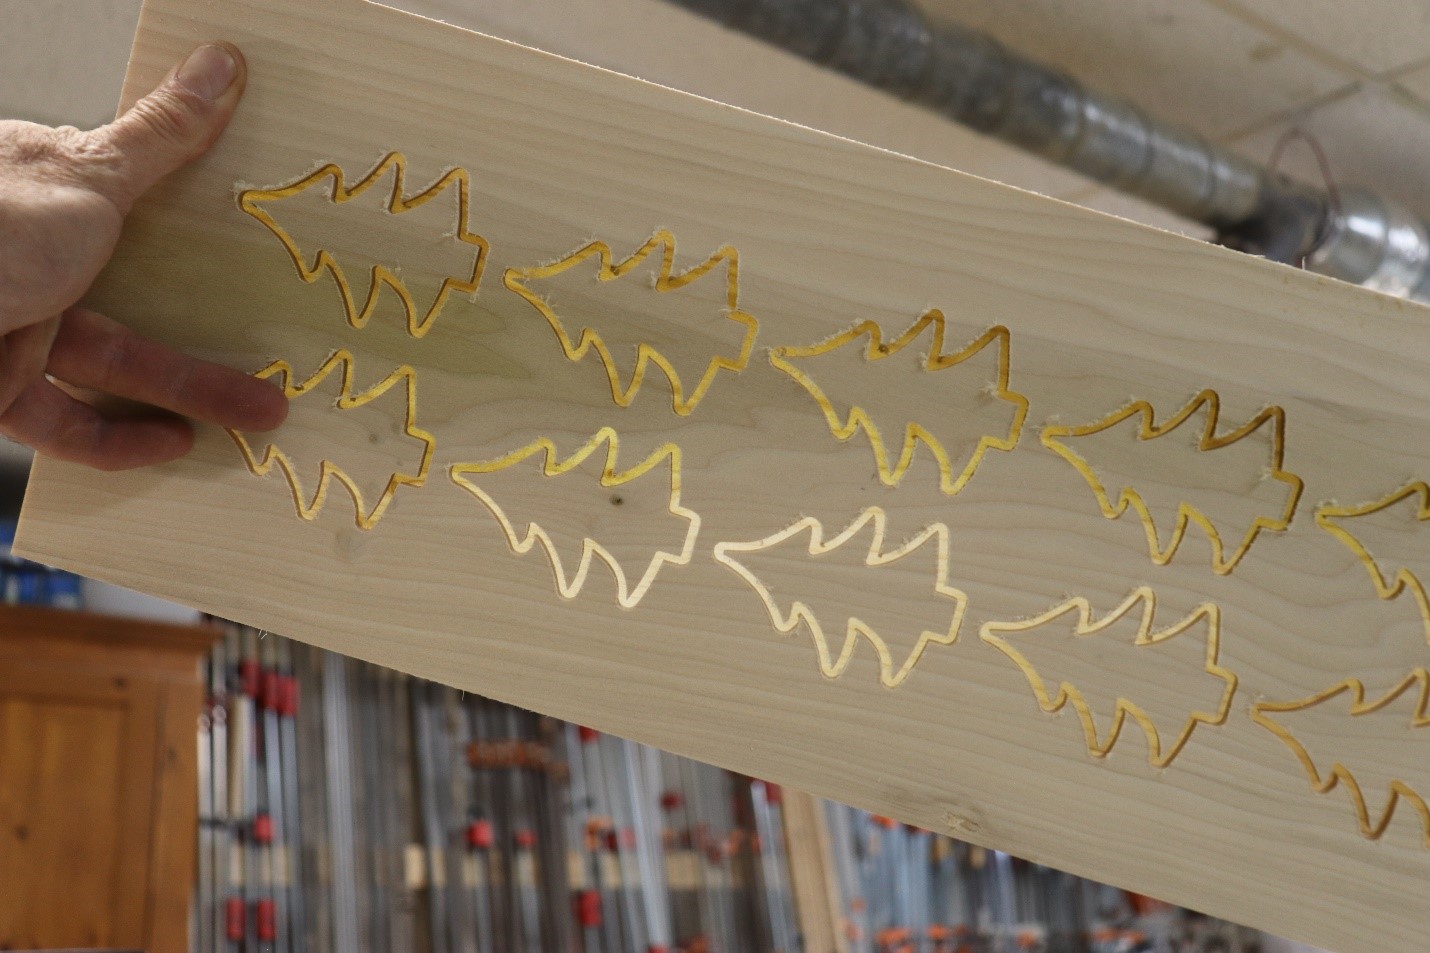
Onion skinning, leaving a paper-thin bit of material at the bottom of a profile cut, is a great way to keep small parts secure on a CNC router.

There are lots of ways to secure your work on a CNC, and keep parts in place while you’re cutting them. Using tabs is common but, because of their size, they may not work well for small parts.
In order to work effectively, tabs have to be fairly large. Onion skinning is often a better choice for small parts. (Think Christmas ornaments.)

The first step in creating an onion skin toolpath is VERY accurately measuring the thickness of your material. A ruler or tape measure won’t give you the accuracy you need. It’s best to use digital calipers.

Create a new file and set up your job dimensions. VCarve Pro, version 10, is being used in this article. Earlier versions may look a little different, but the overall process will be the same.

Set up your design. These Christmas trees are 2” wide and 3” tall, and were imported from the web as clip art.

Select your design (it will turn pink) and use the 2D Profile Toolpath. Select the endmill you want to use.

Set the cut depth to .020” less than the thickness of your material.

If you don’t want to do math, or you don’t remember exactly how thick your material is, you can let the software do the work for you.
Instead of entering a specific depth in Cut Depth, type in Z-.02=. As soon as you type the equal sign the software will show the correct depth of cut.
In cases where you want to cut beyond the thickness of your stock type in Z+.02=, and you’ll cut .020” into your spoilboard.

Select Add ramps to toolpath, name the toolpath, and click Calculate.

Use Preview Toolpaths to check your work. When the onion skin is correctly set up, the profile cut should not be a through cut.
Head for Your CNC

A 1/8” spiral upcut spiral bit works great for small, detailed work like these Christmas trees. Mount your material on the CNC. Zero the X, Y and Z axes.

Run the toolpath.

A successful onion skin toolpath.
Setting the Parts Free
You have a few options for releasing the parts from the main board.

Regardless of what method you’ll be using to release the parts from the board, get started by sanding the front face of the work. It’s LOTS easier to sand these faces while the pieces are still connected.

Use an Exacto knife or utility knife to cut through the paper-thin area surrounding the object. I find that it’s best to cut from the back. Put a light source (like a flashlight) under the workpiece to make it easier to see the toolpath and onion skin.
This is my least favorite method. It’s a slow process and, with a slip of the knife, you might cut into your project piece. Additionally, you’ll have to clean up the last little bit paper-thin material from the edge of each item you cut.

Regardless of what sanding approach you’ll take, put masking tape on the face of the piece, the toolpath side, to bridge the toolpath and keep the parts in place as you sand.

Option 1; Sand from the back with a random orbit sander. Grit choice is a balance between getting done quickly and leaving lots of scratches on the back of your parts.
It’ll be tedious to sand the backs of these small parts once they’re free. I start with 80-grit, but move to finer grit as I see the onion skin getting thin and the parts nearly ready to come out.

Option 2: Sand from the back with a portable belt sander. This is much quicker than using a random orbit sander.

Start with 80-grit and move to finer grits as you see the onion skin getting close to letting go.

Option 3; If you own a drum sander, this is the easiest way to separate the small pieces from the board. You can also do the clean up pass on the front face on your drum sander before applying the masking tape.
A planer isn’t a good choice for this work. Even with masking tape applied to the front face, there’s too much risk of the small pieces coming loose and getting pulled into the cutting head.

Regardless of which sanding technique you use, it’s a very cool moment when the onion skin starts to release. The end is in sight!

Peel the masking tape. The parts may even stick to the tape and come with it as you peel.

Your small parts are ready to go.


