Long gone are the days of only being able to carve wood by hand. While this is a skill that is nice to have, we have much more efficient woodworking tools at our disposal today.
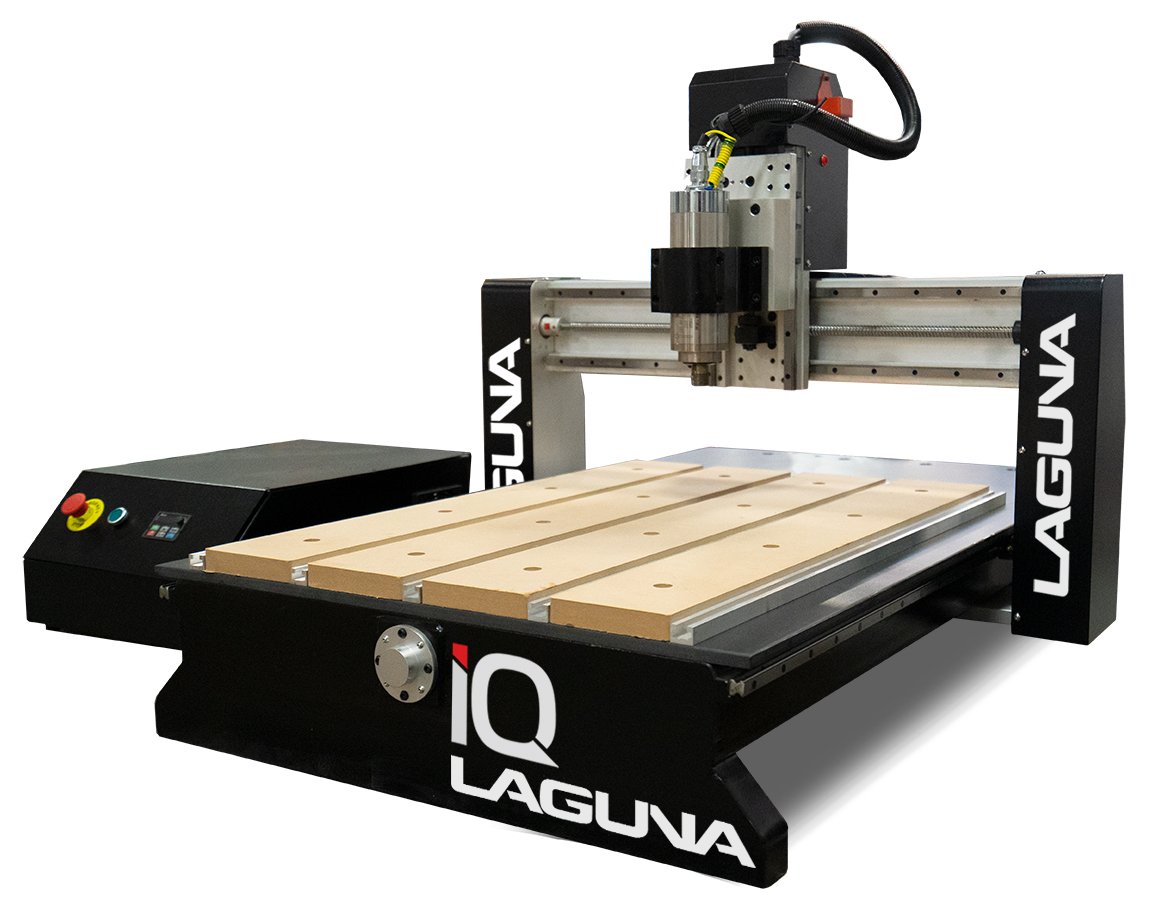
One of our favorite innovative machines here at Laguna Tools is the IQ Pro. Using best in class technology, this machine makes cutting sophisticated designs out of wood extremely easy. You can create just about any type of pattern or shape out of wood.
In this post, we will cover the basics of the IQ Pro machine and how to cut a picture frame using the IQ Pro control system.
Before working with metalworking tools, please bear in mind safety precautions to prevent mishaps in the workshop.
Understanding IQ Pro
As a groundbreaking piece of woodworking machinery, the IQ Pro is every woodworker’s dream. Built to last and to produce beautiful woodwork, you can accomplish anything with this dynamic tool in your shop.
The frame is welded from one piece of steel and has been optimized for motion control. It’s sturdy, stable, and offers flexibility that other machines don’t.
The spindle is compatible with a 1/2-inch tool, and it uses a small motor to generate 3 horsepower. The best part about the spindle is that it also uses an innovative liquid cooling system that keeps the machine running for long periods of time without overheating.
The liquid cooling system circulates water around the bearings to maintain a constant temperature. You can easily run the IQ Pro for up to 8 hours without having to worry about overheating.
The tables offer flexibility in the types of projects you want to take on. This machine comes with sacrificial MDF pads that can be cut along with the wood blanks. It also comes with T-slots for clamping and holding wood blanks in place.
As for wiring, the electrical system is housed in a separate electrical cabinet away from the other moving parts of the machine. This compact system helps to reduce vibrations when the machine is running.
Finally, the most impressive part of the IQ Pro machine is its best in class control system. This software runs on a computer and allows you to use other software programs to create new prototypes.
Easily transfer files, utilize the reverse engineering function, and even change tools with the touch of a button.
Some of the main features in the control system include modeling tools, 2D and 3D view controls, transform, edit, and array.
Designing a Picture Frame Cut-Out
Now that we’ve gone over the basic components of the IQ Pro machine, let’s explore how to create something. While a picture frame may seem easy enough, there are a lot of elements that can go into designing a decorative one.
If you would like to watch the process of cutting out a picture frame from start to finish, check out our handy how-to video that shows the entire step-by-step process.
The picture frame we want to recreate is a curved outside shape with a few sharp angles.
We want to cut a profile all around the frame to give it a molded, sloping finish.
- First, you need to prep the IQ Pro machine. To do this, you can cut the MDF pads to be flat.
- Then, use double-sided tape to tape down the 3/4-inch tabletop.
- Cut a shallow groove into this piece of wood for your blank.
- Next, position the wood blank on top, and tape it down using double-sided tape.
Now it’s time to shift your focus to the control system. Once you open up the software on your computer, you can select the design template you want to go with it.
You can also create your own template or implement specific elements to make customized designs.
After you choose the picture frame design, you need to create a 2 Rail Sweep.
- Do this by selecting two rails. Simply hold the shift key on your keyboard and click the rails.
- Then choose “Use Selection”.
- Next, you want to select the profile and hit “Apply”.
You can view your handy work in 3D mode to see if it’s what you pictured it to be.
For more intricate designs that require more components, things can get a little tricky with alignment. The best way to work around any alignment issue is to make a flat plane.
To do this, simply select “Create Shape From Vectors” and choose your perimeter. Make sure that the base height is set to 0.0-inches, name the component “Plate”, and hit “Apply”. You can then view it in 3D mode to see if that’s what you want.
The Component Tree should display Component 1 and Plate at this point. Move the Plate to the first position, and be sure that all the components are stacked on top of the Plate. Keep in mind that multiple components can be combined used the “Bake” feature.
Next, open Tool Paths on the top right hand side of the interface. Check the contour to ensure that the 1/8 taper bullnose tool is being used. You can also check the outside and inside parameters and simulate the tool paths.
Once you are satisfied with everything, you can run the design through the IQ Pro machine. You will have your picture frame cut-out in a matter of minutes. You can finish off the frame with an oil or varnish of your choosing.
Woodworking Video Series
In our video series, we have several different how-to videos to help you create wood products using the IQ Pro machine. Each video walks you through the step-by-step process, helping you create quality products.
You can also learn how to set up the IQ Pro machine, change out tools and attachments, and even how to properly care for and maintain the machine.
Our site is home to a wide range of videos that go over every classic and industrial machine that we offer in our product gallery.
To learn more about our products and services, get in touch with us today. We love connecting with our customers and sharing our knowledge and passion for woodworking.