I like to spray my finishes for all sorts of woodworking projects. Whether the topcoat is shellac, lacquer or polyurethane, spray finishing gives me control over the final outcome. If you’ve ever been frustrated by drips or an uneven wipe-on finish, I encourage you to experiment with spray finishing.

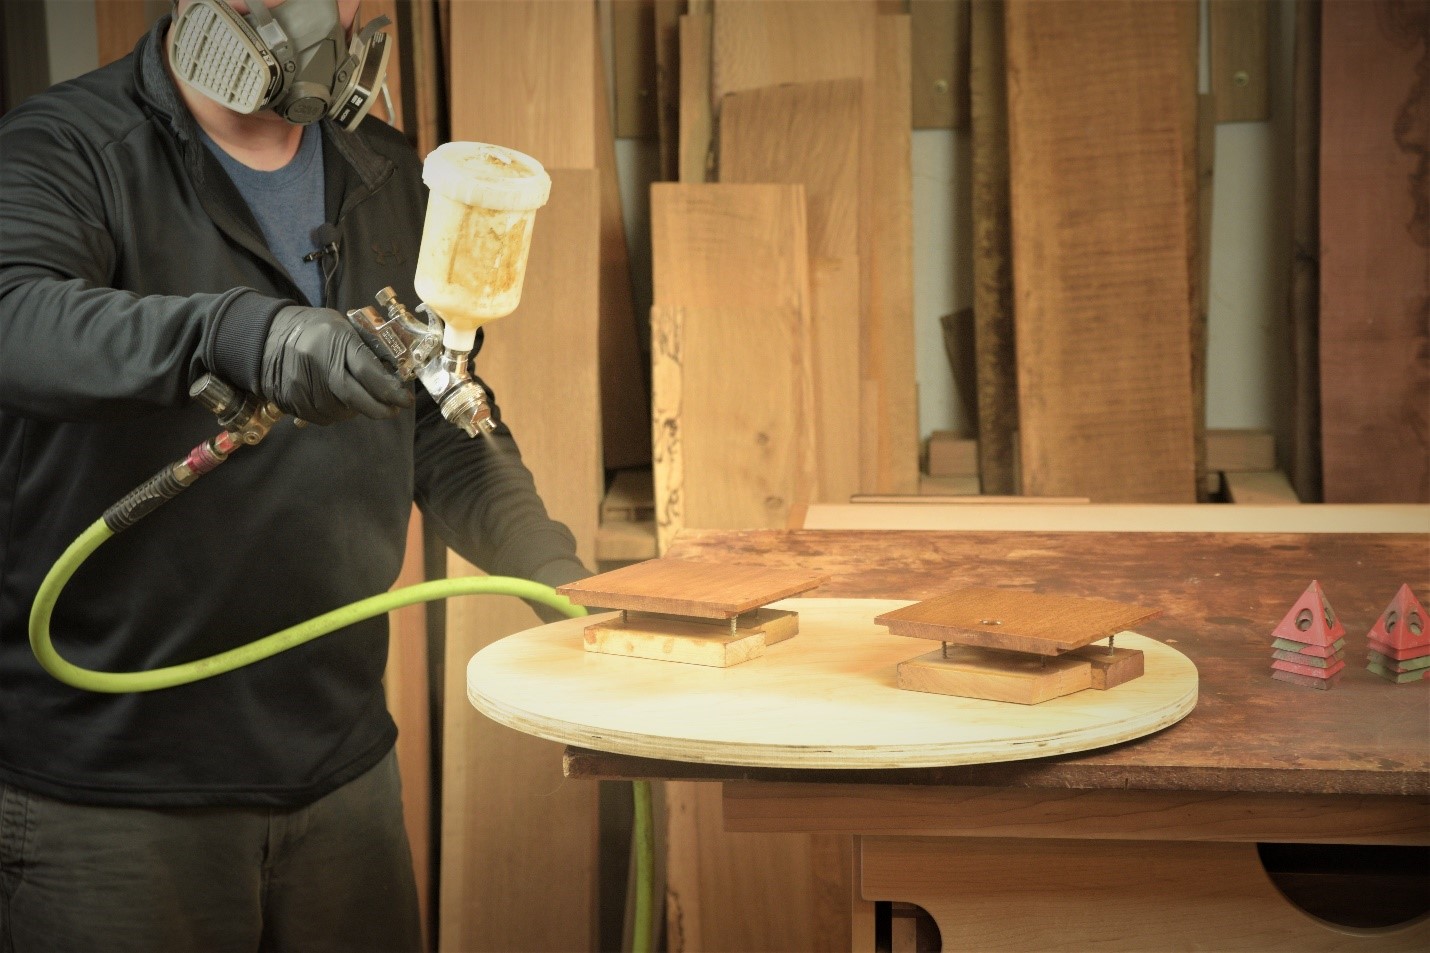
When spraying small projects and intricate parts, one accessory I find invaluable is a spray turntable. Load your project parts on the turntable and blow them off with a shot of compressed air. Elevate the parts to be sprayed on Painter’s Pyramids, or simple screw blocks. The screw blocks are just scraps of wood with drywall screws driven in from underneath. This supports the workpieces in a very small surface area, so nothing sticks to the freshly sprayed finish. Now you’re free to turn the projects for the perfect application angle as you spray. It’s much easier than trying to reach around the project “blind.”

To build the turntable, I started with a piece of plywood 24” square. Then I cut it to a perfect shape with a bandsaw circle cutting jig. Mine finished about 22” diameter. Soften the edges with sandpaper so they’re easier on the hands for repeated use in the shop. Then simply mount the circular piece of plywood to “Lazy Susan” hardware. The hardware item is fairly common for household use in cabinets or on tables. However, there are some specifics to keep in mind when sourcing the turntable hardware.

You want a Lazy Susan with a diameter no less than half that of the plywood circle. I selected a 12” Lazy Susan for my 22” turntable. If you used a smaller metal hardware ring, the turntable may be unstable once loaded with project pieces. Another feature to look for is rubber bumpers on the bottom of the Lazy Susan. This allows you to set the metal ring right on your workbench. Without these rubber bumpers, you may need to make a second plywood circle to use as a base. Since my Lazy Susan hardware came with several rubber bumpers underneath, I was able to skip the second plywood circle. This became an advantage, because it keeps the turntable lightweight. In fact, one of my main goals when building jigs, fixtures and shop aids is to keep them as light and maneuverable as possible. This way, I actually use them!
You won’t believe how such a simple device actually improves the quality of your spray finishing. Not just because the parts are easier to reach, but also because they’re easier to see. I often have bright lights set at a raking angle to spray finish projects. By slowly turning the project on the turntable, I’m able to get the project in just the right light to spray on a perfect finish. This helps avoid runs and “orange peel” before they even start.
So, if you’re looking to step up your spray finishing game, or add a new skillset in the shop… build a quick and easy finishing turntable this weekend!