A cutting board might be one of the very first projects you tackle as a woodworker, but have you ever made an end grain cutting board?
They make an incredibly tough cutting surface, and it lets you uniquely experiment with patterns to your taste. Read along this fun weekend woodworking project that anyone can handle, whether you're a beginner or an advanced woodworker. 
Start by ripping strips of hardwood, as if you were making two regular long-grain cutting boards. Padauk and walnut were selected to provide subtle contrast and a slight color to the finished product. The key is to make one board with 3” wide padauk strips, and another board with 2” padauk strips. As far as the walnut boards, simply size them to fill in the field, so the resulting boards are both 13” wide. For those who are considering adding a new tablesaw, check out the Laguna Fusion F1 tablesaw, equipped with plenty of power to give you quality cuts you can trust.

Next up, you will want to glue up the two long grain boards. The one with narrow strips of padauk is pictured here, and this step will provide stock for cutting strips that will eventually help make the end grain cutting board. 
Use a crosscut sled to create 1-5/8” wide strips from the planks you made. A stop block on the sled helps make this an easy, repeatable cut. The size of the board is up to you, but I used about 14 strips from each plank for this example. The last strip is cut using the rip fence, to avoid crosscutting a small piece.
Now glue the strips back together, use a smooth trim paint roller to quickly apply glue to one side of each strip. With this many joints to glue, you need to move quickly, using a small foam roller works great. Not sure of what glue you may want to use for your cuttingboard projects? Check out this list of the best glues currenty on the market.
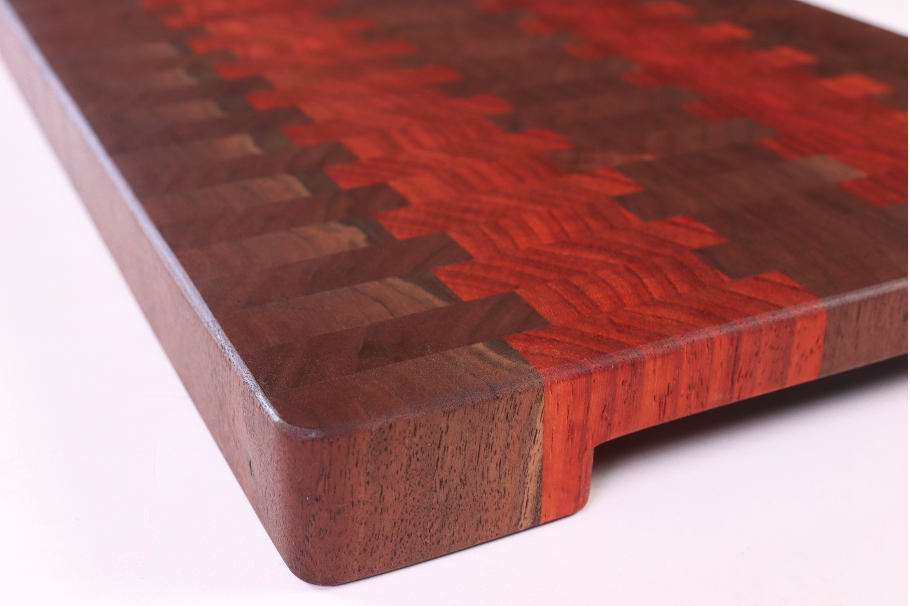
Carefully assemble the end grain cutting board, alternating wide strips and narrow strips of padauk. Align the edges with clamping cauls, and apply adequate clamping pressure to close the joints. Use clamps on top and bottom to keep the assembly flat.
Let the glue dry enough to scrape the excess with a chisel. Clean up the panel as best you can in preparation for the next step.
Now, if possible, you will want to drum sand end grain. While a planer certainly works well for tabletops and long grain cutting boards, when working with end grain I strongly suggest you use a drum sander. It will safely flatten this massive cutting board in just a few passes. Lagunas line of SuperMax Drum Sanders are the best on the market, theres a reason they have a strong following. The 16-32 SuperMax is the perfect option for those who are looking for an upgrade.
Once you have the faces flattened, trim a clean edge on both sides of the cutting board. This is a pretty routine cut, just make sure to leave a symmetrical swath of walnut on either side.
Next you will route out the hand-holds. Use a shop-made template to guide a bearing-guided bit to remove a recess for handles on this large cutting board. You may need to make multiple passes to achieve the desired depth. To accomplish this, I started with a ½” long pattern bit and made the second pass with a ¾” long pattern bit.
Make sure to select a food-safe finish. Some woodworkers use straight mineral oil, but I find this leaves the board feeling oily, and it never seems to dry. Instead, I prefer to use a mineral oil and beeswax blend such as Howard’s Butcher Block Conditioner.
Applying the beeswax blend couldn’t be much easier. Wipe it on with a lint-free rag and let it soak in for a few minutes. Then wipe it off with a fresh rag, and let it dry for a few hours.
Once it has finished drying, you now officially have a perfect centerpiece for your kitchen counter, or maybe just a great handmade gift ready to given away to a loved one. The more you do cutting board projects the more comfortable you will get experimenting with different kinds of woods and patterns that will ultimately give your boards its unique personality and distinctive look. With the right tools and a little imagination, the possibilities are endless!
Here's a recent repost we uploaded on Instagram showing how creative some of our customers can get with their cutting boards:

Willie Sandry is a Freelance Writer for several woodworking magazines, blogger, and crafter in wood and leather. Check out Willie’s YouTube channel The Thoughtful Woodworker


