Many years ago I received an order from a client for a serving tray, and she wanted the popular style where you start with a thick plank and dish out the waste in the center to form a tray. The thought of wasting so much expensive wood sent shivers down my frugal spine, so I came up with an alternative approach that would build up stock to form the tray rather than hogging it out. The client loved it, and I have been making them that way ever since.

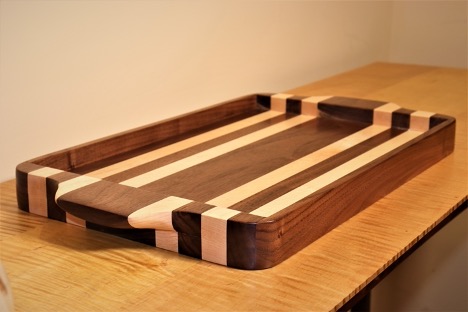
Start by making a cutting board. Come up with whatever design pleases you. I like a symmetrical design, and here I featured a 3” wide strip of walnut in the center, with alternating 1” strips of walnut and maple spanning to the sides. The panel size that I made was 11” x 23”. You can go for whatever size you’d like, but be sure that the width will fit through your planer. The 11” width fit comfortably through my Laguna PX12.

Plane it smooth. As you run the panel through your planer, it’s critical to get a snipe free cut. The locking cutterhead on the PX12 ensures a snipe free surface, which is important for the next glue-up step.

Cut a section from each end. After trimming the ends square using a panel cutting jig on your table saw, cut a 2-1/4” wide strip from each end. Carefully mark it to ensure that you glue it back onto the panel in the correct orientation. You will kick yourself if you do this wrong, and your woodworker friends will marvel when you get it right because the joints will be nearly invisible, making it look like you plowed out stock from a thick panel.

Glue and clamp the strips to the panel. Using a 1” overlay in surface area, glue and clamp the end strips that you cut off in the previous step to the main panel. The 1” overlay provides plenty of surface area for gluing, and allows the handle to extend well past the end grain on the main panel to make efficient use of the stock and extend the size of the serving tray.

Joint the sides. After the glue has cured, scrape off any glue residue. Then, run each side of panel through the jointer to provide a clean, square edge for gluing.

Attach strips to sides. Cut strips of walnut (or whatever your outer-most wood is) that are 3/8” thick and tall and wide enough to cover the serving tray. Glue and clamp in place.

Draw lines for handle. Mark the handle width with a witness mark on each side. I went for a 4” wide handle, and I was careful to not have the cut go across a joint near the end of the handle, as it’s better to cross a joint with a cross-cut angle rather than a rip angle. I used a roll of tape and a glue bottle to form the gentle curves on the handle and corners of the tray.

Cut on the bandsaw. Using a bandsaw, cut to the shape that you drew in the previous step, being careful to leave the line. As you can see I used a series of relief cuts because I had a 5/8” wide blade that was too wide for these curved cuts. The relief cuts made it easy.

Sand to the line. Now use a sander to sand to the lines on your handle and end grain.

Shape the handle. Using a rasp, shape the handle to a pleasing proportion. Sand smooth once you reach your desired shape.

Apply a finish. Here I’m using a wipe-on poly finish because it’s durable and user-friendly, but any finish will do fine here.
If you’d like to watch a video of this tray being built, check out the ToolMetrix YouTube channel.


