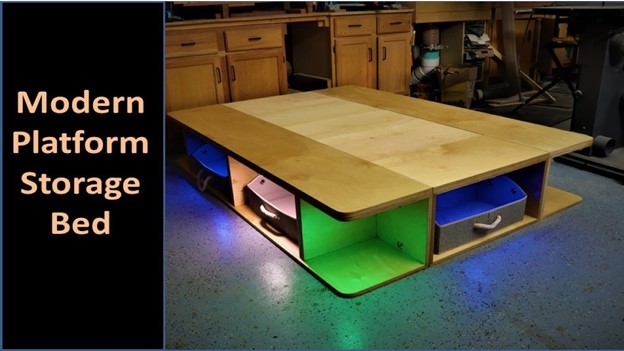
My son asked for a space-saving bed for his college bedroom. He wanted enough built-in storage to eliminate the need for a dresser. Other design requirements were to provide a modern aesthetic along with easy portability and bullet-proof robustness. This bed needs to withstand three years of abuse in multiple living locations with large numbers of rambunctious roommates and guests.
We came up with this simple design that delivers on all of the requirements and it turned out great. The measurements in this plan are designed for a platform that accommodates a full-size mattress (I ordered an inexpensive memory foam mattress from Amazon that worked great with it).
Adjustments can be made to accommodate other sizes. I captured the entire build process in a video that you can find here.

The project is simple to build using the following tools:
- Table saw
- Jig saw
- 18 gauge brad nailer
- Random Orbital Sander
- Biscuit joiner (optional)
For materials I used Baltic Birch plywood, which is a great material for a project like this because it is gap-free, solid, stable, and looks great with raw edges exposed.
If you like the modern aesthetic at an Apple Store or Chipotle restaurant, you’ll love the look that you can achieve using Baltic Birch plywood.


To get started, cut the plywood into pieces as designated in the cut-list (all pieces are cut from ¾” plywood).
This can be done using a table saw, although if you have a smaller table saw you might want to make the initial cuts using a circular saw, until the pieces are cut down to a more easily manageable size.

I used biscuit joinery to add strength and alignment to the bed construction. Another good option would be pocket screw joinery.
If neither of those two options are viable for you, glue and brads would be sufficient.

After your pieces are cut and slots milled, begin assembly with the two large boxes. This assembly uses glue and #20 biscuits.
Check for square before letting the glue cure.

After the glue sets up for an hour or more remove the clamps and attach a second layer of plywood to the top.
This is done to add rigidity and additional strength on the open ends where the materials are cantilevered without support.

Using a round object draw a large radius curve on the corners and cut using a handheld jigsaw.
This is an important step that will prevent shins from getting bruised when people walk past too closely.

After both large boxes are assembled attach a 2x4 cleat on the back side of each one using glue and brads.
The cleats will be used to hold the filler pieces that cover the gap in the middle of the bed to support the mattress.
If you have a planer and jointer available, use those to create a nice S4S board to use as your cleat.

Assemble the small box for the end section. This uses simple rabbet joinery; no biscuits or pocket screws are necessary.
Be sure that the box remains square as clamping pressure is applied, and make any adjustments necessary to the clamps to keep things square.

Sand everything aggressively, rounding over the corners. You want to create a smooth surface in all areas of the platform.

Use 3/8” bolts, washers and nuts to secure the three box members together as shown.

Ensure that the bed is squared up so that the width is the same at the foot and head ends of the bed. Measure the gap in the middle of the bed at both ends (it should be the same).
Using leftover pieces of plywood, cut filler strips to cover the opening of the bed. Ideally you will want to cover the gap entirely.

I found some inexpensive but good quality storage bins that fit perfectly in the bed storage zones, and this is a great way to keep items accessible and organized.

Adding remote controllable color-changing LED lights is a great low-cost way to “bling” up the bed.
This bed is a great project for the beginner to intermediate woodworker and can built in 2-3 days using a modest tool set.


