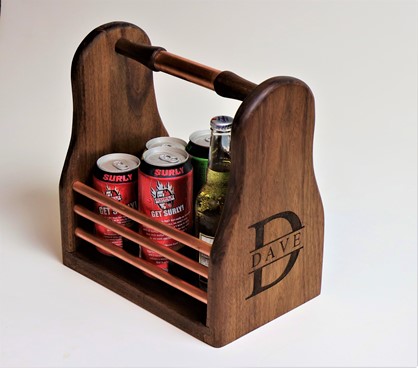
As we move into the summer months, my project ideas seem to gravitate to projects which support warm weather activities. My friend Dave likes to take along a selection of his favorite micro-brews when he attends a summertime picnic or BBQ, so I decided to make something for him to showcase his cool cargo.
My beer tote design includes a few unique elements: First, I wanted to include some copper because I think it works well as a complement to wood, particularly a dark species such as the walnut that I used here. Copper not only looks great when it is brand new, but the patina that it develops over the years through exposure to oxygen, sun, oils and general wear, takes its beauty to a whole new level. Second, I wanted to add some pizzazz to the handle so I combined a turned spindle with a section of copper pipe to create a unique look. And finally, laser engraving is a great way to personalize any project so I engraved my friend’s name in an attractive design.


Start with the handle. Use a 4” long x 1” OD copper slip coupler for the handle, and a walnut blank that started out 1-1/4” square by 10-1/2” long. Turn the handle on your lathe following the sizing guidelines in the diagram. Start by reducing all diameters to the appropriate size, then shaping everything to a pleasing profile that tapers gently from the small diameter near the ends to the larger diameter near the copper piece. Leave the diameter of the handle larger than the copper pipe near the joint, then taper it gently toward the copper for the last 1/8” where the wood and copper meet.

Glue up the handle. Add thick CA glue and join the handle pieces, clamping to hold them solidly until the glue cures.

Mill the end panels. First, use a table saw to mill a dado near the bottom of each panel as shown. Then use a drill press with a forstner bit to mill the recesses in the locations shown for the copper tubing as well as the tenons in the handle.

Cut the curves. Using a bandsaw and a high quality 3/8” blade, cut the curved arch on the top of each end panel.

Sand smooth. Use a belt sander to smooth out all of the curves on your bandsaw cuts.

Laser engrave. If you have a laser engraver in your shop, now would be a great time to engrave the design into one of the end panels, such as the initial of the recipient. I engraved the image on my tote using a Laguna PL 12|20 laser.

Cut the bottom as shown. Mill a rabbet at each end of the panel, testing the fit so that it slips into the end panels with just the slightest friction.

Unroll and cut tubing. I used 1/2” flexible copper tubing. This type of tubing is a bit rigid and takes some persuasion to straighten out. I found that I could get it straight by using hand pressure to force it down to my bench, and then rolling it on the bench while pressing down on it. Cut each piece to a consistent length of 10-1/8” using a pipe cutter.

Assembly time. Before applying glue, do a dry run and make sure that everything comes together smoothly. It can be a bit tricky to get 7 joints to come together in the same directly, so take your time and use a glue with a long open time to take the pressure off of yourself. For complicated glue-ups I like to use Elmer’s Glue-All (yeah, the white stuff that you used in elementary school) because it cures very slowly compared to most carpenter’s glues which add drying accelerators to speed things up.

Cut the dividers. The dividers are cut using cross-halving joinery that just slips together. Cut these using a bandsaw or table saw and base the size of the opening on the thickness of stock so that they just slide together with a bit of friction. The dividers then sit loosely into the base of the tote to keep the beverages from clanking together.

Apply a finish. Use your choice of finish to bring out the grain pattern of the wood and to offer some protection. Here I applied a few coats of Danish Oil which is one of my favorite finishes on walnut.

Install bottle opener. If you would like to include and integrated opener, install that after the finish has cured. I like the look of this copper opener as it matches nicely with the copper pipe used in the project.
|
Label |
Part |
Dimension |
Qty |
|
A |
End Panels |
¾” x 7-1/2” x 12” |
2 |
|
B |
Bottom |
¾” x 7-1/2” x 10-1/4” |
1 |
|
C |
Flexible Copper Tubing |
½” OD x 10-1/8” |
6 |
|
D |
Divider Cross Section |
3/8” x 5-3/4” x 2-1/4” |
2 |
|
E |
Divider Long Section |
3/8” x 9-1/2” x 2-1/4” |
1 |
|
F |
Copper Handle Grip |
7/8 OD x 4” L |
1 |
|
G |
Handle pieces |
1-1/8” x 4-3/4”L |
1 |
|
H |
Bottle Opener |
|
1 |
If you would like to see a video of this project being made or if you have questions, check out the ToolMetrix YouTube channel.