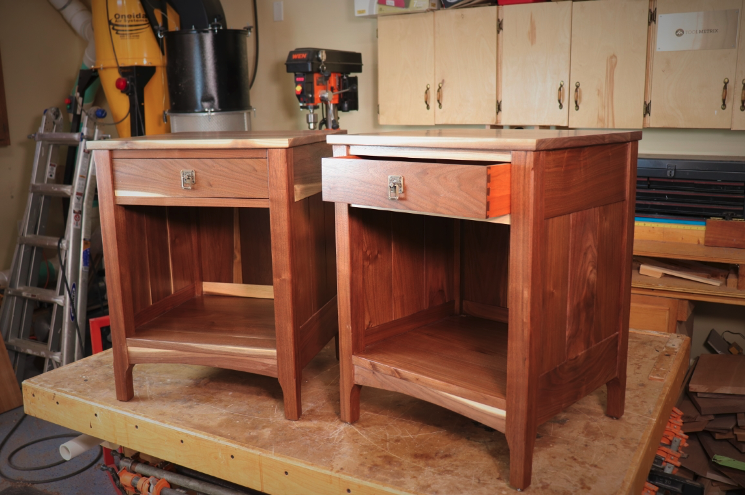
I recently built a pair of walnut nightstands for my daughter, these being the first (hopefully, of many) pieces of furniture that are built specifically to accommodate her adult life. She wanted a traditional design, and through her online research the piece that she ultimately requested was one that actually had a project plan available for it. I bought the plan, made a few adjustments, and proceeded to build the nightstands. Here are a few observations and highlights from the project:

Materials. This piece is built almost entirely from solid wood, giving it great durability as well as a substantial presence. My daughter chose walnut as the primary wood species, and requested that I include a fair amount of sapwood to give the nightstands a unique and modern flair to a predominately traditional design. I love incorporating sapwood into projects whenever possible, especially with walnut where the contrast is so pronounced. I chose cherry as a secondary wood because I love the subtle contrast that it brings with cherry. The only component that is not solid wood is the drawer bottom, and there I used a cherry MDF core plywood.

Hardware. To give the piece a unique accent, I scoured the internet and ultimately sourced some beautiful arts and crafts style pulls on Etsy. Pro tip: always buy an extra pull or two in case one gets damaged. I always toss an extra one into a drawer on each piece that I build, which will save you a lot of hassle in trying to find a replacement years later.

Drawers. For a drawer on this traditional piece I decided to use hand-cut dovetails as the joinery. For me, “hand-cut” means that I don’t use a jig, but I do use my Laguna bandsaw for the cuts to speed up the process.

Finish. For a traditional piece I like to use a low gloss finish. Sometimes I will use a penetrating oil such as Watco, but for nightstands I like more moisture resistance. Many people like to place a glass of water on their nightstand each night, and over the years that can lead to water rings and other damage. To minimize this risk, I applied several coats of wipe-on polyurethane. Satin wipe-on poly maintains a traditional appearance while maintaining maximum moisture resistance.

Joinery. The legs on this project are where you will spend a lot of time, determining joinery layout. I used floating tenon joinery which required some minor modifications to the plan, but this simplified construction compared to traditional mortise and tenon work.

Wood movement. Using solid wood for cabinet construction means that you will have to spend some time thinking about how that wood will expand and contract due to seasonal fluctuations in humidity. The side and back panels in this project incorporate tongue and groove joinery that allows for plenty of wood movement. To ensure that this movement is allowed, it is important to execute this joinery with enough of a gap that it won’t bind up after finish is applied. I per-finished all of the panels prior to assembly, so that I wouldn’t have to apply much finish after the glue-up. The reason that I did it this way is because I built a similar project one time and the floating panel was fixed after applying several coats of poly, and after a year of use I noticed that the frame had cracked due to the expansion of the panel. So, learn from my mistake.
This was a fun and satisfying project. If you want to build one of these, I’d encourage you to pick up a copy of the plan, and for more tips also check out the video on the ToolMetrix YouTube channel.


