Face frames are a great way to create a professional look for your cabinet, tying together the cabinet carcase and providing visual continuity between drawers and doors. As with any woodworking project, there are many different approaches that could be used to build face frames. I’ve tried many different methods over the years, and I’ve landed on an approach that is simple, efficient, and produces great results every time.

It starts with perfect stock.
You will want to take the time to ensure that your material is flat, square and straight. If you convince yourself that you can get away with some imperfection, you will regret it, because clamp pressure can’t fix a problematic face frame. Therefore, take the time up front to run the wood through the necessary sequence of steps, using a jointer, table saw and planer to true-up the stock as needed. When you cut your rails, make them 1/8” longer than you need, which will give you 1/16” overlap on each side of your cabinet. That gives you some “wiggle room” when attaching the face frame to the cabinet, in case your cabinet carcase isn’t perfectly square.

Pocket hole joinery is the most efficient method.
I’ve built face frames using half-lap joints, biscuits, tongue and groove, and pocket hole joinery. I prefer the simplicity and efficiency of pocket hole joinery over other methods. The process starts by milling a single pocket hole centered in the ends of each rail. You might be tempted to squeeze in a second pocket hole for the added strength and alignment benefit, but a single screw along with glue provides more than enough strength for this application. Once a face frame is attached to the cabinet carcase, there will be very little stress placed on the face frame joinery.

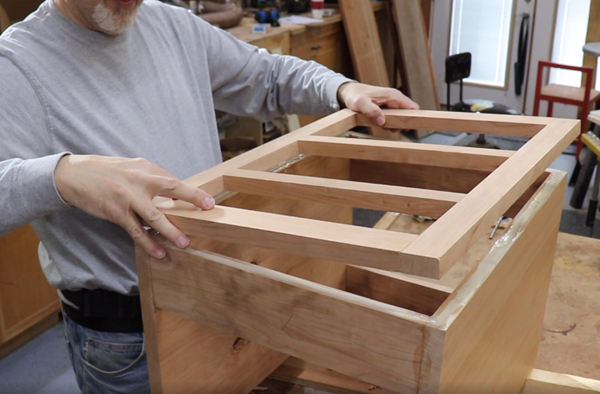
Use a spacer to position inset doors and drawers.
After all of the pocket holes are milled in the rails, begin attaching each rail to the first stile. Pocket hole joinery has a great benefit at assembly time in that it allows you to focus on each joint individually. With a traditional glue up you typically have multiple glue joints open at once, making assembly more stressful. Take advantage of that time benefit and use a spacer to position the rails for perfect placement. Here I’m using a template for the drawer faces that will be used, and it allows me to keep the rails parallel to one another and square to the stiles.

Give yourself a little friction.
Before attaching the face frame to the carcase, tap in two finish nails on opposing corners, and snip off the nail so that only 3/32” is exposed. This will help you to lock the face frame into the exact position that you want, and prevent it from slipping when you apply clamping pressure.
Glue and position face frame.
Apply a liberal coating of PVA glue to the edges of your cabinet carcase, and carefully set the face frame in place. Divide the 1/8” overhang evenly so that there is some overhang on each side of the cabinet. There’s no need for mechanical fasteners to connect the face frame to the carcase; glue alone will provide plenty of strength.

Clamp the heck out of it.
Position clamps around the perimeter of the face frame ensuring that the face frame makes gap-free contact with the carcase at all points. Remove glue squeeze out, inside and out, immediately after clamps are tightened.

Make it flush.
Make the face frame flush with the cabinet body by using a combination of using a block plane to remove the bulk of the overhang, followed by clean-up using a random orbital sander. If you’re careful about keeping the sander flat to the cabinet body, you can avoid sanding through the veneer. On cabinet-grade plywood, the veneer is typically thick enough to endure some sanding.
To see a video of this entire process check out the video on the ToolMetrix YouTube channel.


