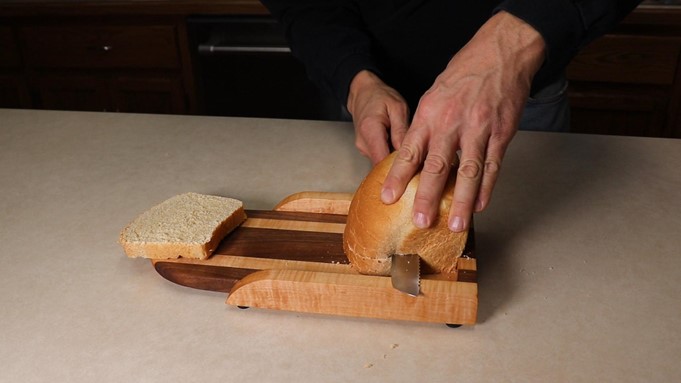
If you have a bread lover in your life you will want to make one of these simple slicing guides that allows you to cut a perfect slice of bread every time. The user will love the consistent thickness from top to bottom and side to side. No more cutting “bread wedges” when you want even sandwich slices.
The guide is simple to use; set the bread in a vertical orientation on the base and hold it with one hand while you run the knife along the cutting guide with the other. It produces a perfect slice every time.

First rip your strips. I made my cutting guide using a pattern of contrasting wood strips that I ripped on a table saw. Determine the pattern that you want to create, and make yourself a cut list to be sure that your width comes out correctly to support a typical loaf of bread which is generally about 4-1/2 - 5” wide. I cut strips to produce an initial panel size of 3/4” thick x 5” wide x 14” long.

Glue and clamp. Use a waterproof glue that is FDA-approved for food contact such as Titebond 3 to glue the contrasting strips together to form a solid panel. Position your clamps a few inches apart, apply modest pressure, and wipe off any excess glue before it sets up.

Plane to final thickness. After the glue has sufficiently cured (2-3 hours minimum) run the panel through your planer. This is an important step because the thickness you choose will determine the thickness of your bread slices. I set the PX|12 planer’s depth stop to 5/8” and ran the panel through a few times until it arrived at that thickness.

Drill a hole. Drill a 1” hole located in the center of the panel 1” from the top. Use a router and a 1/4” roundover bit to create a smooth taper on each side of the hole. The hole can be used for hanging and displaying the panel.

Cut a curve on the top. Use a bandsaw to cut a gentle curve across the top. Sand the curve smooth using a belt sander, then use a a router with a roundover bit to ease the sharp edge.

End rail. Cut a 3/4” wide strip off the end of the panel, and glue it to the top of the panel. Keep track of the orientation of the piece as you cut it off, ensuring that you glue it to the top in such a way that the pieces align perfectly. In other words do not flip or rotate the piece before gluing it; keep it in the same orientation and just set it on top of the panel. This will give it as seamless appearance.

Side rails. Cut a strip of wood to 3/4” x 2” x 9” long. Set it in position next to the cutting guide and mark for final height. Cut to your line on a table saw.

Taper the side rails. Cut a gentle curve on one end of each side rail. This will serve as a gentle on-ramp for the knife as it approaches the bread, and it looks more pleasing to the eye. The more curves you add to your projects, the more people seem to like them.

Glue the side rails to the base. Use gentle clamping pressure to secure the side rails. No need to add mechanical fasteners such as brads or biscuits as the glue will provide plenty of holding power.

Sand corners flush. Use a random orbital sander to sand the corner joints flush. If these pieces are not perfectly flush, the misalignment can cause problems with the bread cutting operation, so take the extra time and ensure that the joints come together perfectly.

Finish. Apply a few coats of a food safe finish such as mineral oil or walnut oil to pop the grain and provide some moisture resistance.

Non-slip feet. Install a rubber pad on each corner to prevent the piece from sliding as you use the cutting guide. Be sure to get the type that prevent slipping rather than the ones that enable it.
If you want to watch this project being made, check out the ToolMetrix YouTube channel.


