Perhaps it’s due to the pandemic, or the hipster movement, but whatever the cause it seems that there is a resurgence of facial hair growth. As a frequent beard grower myself, I welcome the renewed popularity of the “soup strainer”. When my beard makes an appearance, it’s not my wife’s favorite look, but she is willing to abide as long as I keep my facial hair tidy. In addition to regular trimming, that also means using beard oil and running a comb through it daily to tame the beast. As a woodworker, I thought it would be fun to make my own comb, and a great way to use up a small, miscellaneous piece of wood.

Stock selection
The teeth on a beard comb are tiny, which makes them vulnerable to snapping off. Therefore, be sure to choose stock that is hard and has straight grain. I used Wenge because I had a small plank on hand, and its tight pattern of contrasting colors brings visual interest to this small project. Other good choices would include maple, walnut, oak or other domestic hardwood species.

Mark for overall shape.
I started with a piece of stock that was 3/4” thick by 4”. You don’t need much length of this project, but I recommend starting with a plank that is at least 12” long, as this gives you a long/safe “handle” as you make your cuts on the bandsaw.

Mark for teeth.
Draw lines for the outside teeth as well as the baseline that will indicate the top of the teeth. I left 3/8” at each side that would not be cut into teeth, and drew a baseline that indicated a tooth length of 3/4”.

Make tooth cuts.
Position a stop block to establish consistent tooth length. I did this by clamping a piece of scrap wood to the table on my Laguna 18bx bandsaw. A bandsaw is a perfect tool for making the tooth cuts because it leaves a kerf that is an ideal size for a beard comb. If you choose to use a table saw for this operation, I would suggest using a circular saw blade with a 1/16” kerf, and you will want to rig up a jig that can hold the piece vertically as you run it through the cuts.

Make the tapering cuts.
After all of the teeth are cut, set the piece on edge and cut to your lines, leaving 1/8” of thickness on the tip, and exiting the work piece at the top of the comb.

Sand.
Now is a great time to do a lot of the sanding because the comb is still attached to the longer board, making it much easier to handle while you sand. Here I have the work piece in a bench vise while I carefully sand between the teeth. Sand thoroughly and aggressively to remove any imperfections that might snag your beard while you are combing.

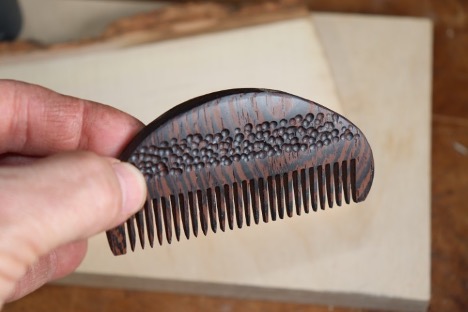
Power carve.
I decided to add some additional flair to the comb and I used a Dremel tool to carve some dimples, making it easier to grip. I also used a roll of tape as a “fancy guide” to mark a curved line to indicate the top of the comb.

Final cut.
Use your bandsaw to cut the curved top line, leaving the line so that you can sand to it.

Apply some finish.
After sanding the curved top, I used Pita’s Wood Therapy Wax to finish this project. It’s a non-toxic finish that can be easily refreshed, and it leaves wood feeling smooth and luxurious.
If you want to watch a video of this project being made, check out the ToolMetrix YouTube channel.


