There are a few conversation topics that are inevitable whenever woodworkers get together; “what is your favorite wood species?”, “what is your approach to finishing”, and the one that serves as the starting point for this article, “what do you do with your scrap wood?”. I try to be judicious about parting with most of my scrap material because otherwise it will just accumulate and badly crowd my modest-sized shop. Some pieces, however, are simply too beautiful to toss out.
There aren’t many projects that I make that call for such small pieces of wood, assuming that I don’t have a larger stash of the same species, but there are a few items that I periodically make using such pieces and my favorite ways to use “special scrap” is to carve a spoon.
But, aren’t you supposed to carve with green wood?
Traditional carving, using knives and gouges, is much easier when you use green wood. The cuts are far easier to make and you can achieve a smoother surface compared to fighting the hardened grain of wood after it has dried.
I enjoy carving an occasional spoon using traditional means, but when I have scrap wood left over from a furniture project, its moisture has long since left the building. Since I have power tools and I enjoy using them, spoon carving is still a viable option.
What tools are needed?
For my approach to carving spoons from dry wood, the following tools are essential:
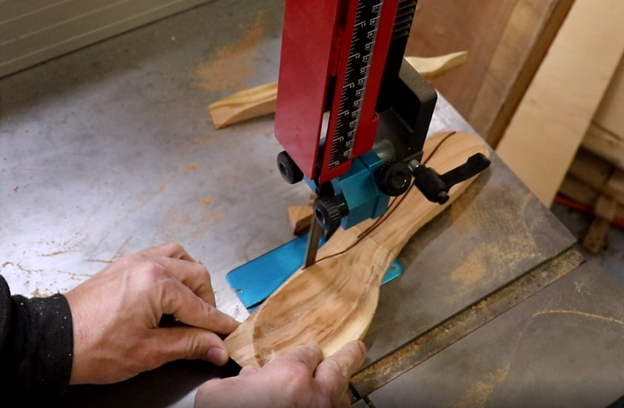
Bandsaw. I use a bandsaw to cut the rough shape of the spoon. Using a bandsaw for this step eliminates about 90% of the time consumed and dust generated from the process.
Die grinder and burrs. I use a die grinder with a couple different burrs to scoop out the bowl of the spoon and refine the shape of the handle and outside of the bowl. I use a small cylindrical shaped burr for most of the shaping, and a ball shaped burr to define the inside shape of the bowl.
I do not use, and do not advocate the use of router bits to be used in the die grinder as it is dangerous to do so.
Power sander. After the shape has been refined with the die grinder, I use either a palm sander and/or a random orbital sander to fine tune shaping and make the surface baby-butt smooth.
Getting started

My first step is done on the bandsaw where I make an angled cut to establish the profile of the spoon’s bowl.

Then I clamp the work piece down to the bench, trace my spoon outline onto the blank, and use a die grinder with a coarse burr to scoop out the bowl of the spoon.
Use a light gentle sweeping action to create as smooth a profile in the bowl as possible.

Sand the bowl as smooth as possible, using grits up to 400 or higher. Using a drill and sanding pad can speed this process along, but it also works well to sand this small area by hand.

Cut the spoon to its final shape using a bandsaw. Start with the profile cuts to define the arch on the handle as well as the bottom of the bowl. Then set the spoon flat and cut to the outline.
Be sure to leave the line on all cuts so that you can “sneak up” on the final shape using a die grinder.

Mount the spoon in a vice with soft jaws and use a die grinder to sneak up on the final shape. Be conservative with your cuts, and leave some shaping for the sander.

Using your preferred sanding method, start with 80 grit for final shaping, then work through the grits to 400 or 600.

Apply liberal coats of mineral oil and butcher block finish to complete the project.
To care for your spoon, hand wash only (no dishwasher) and apply a coat of mineral oil any time it starts to look dry.
You can see this power spoon carving project in a video here:


