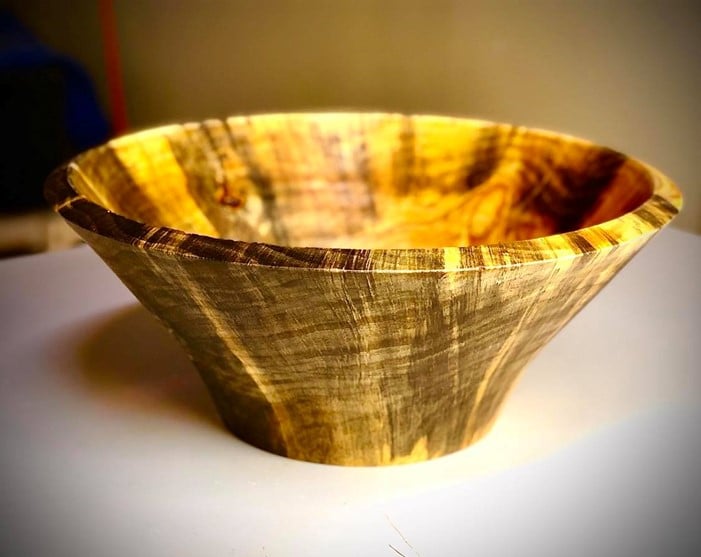
The majority of wooden bowls are turned with the grain orientation such that it runs horizontally through the finished piece, with end grain appearing on two sides of the bowl. This approach generally yields bowls that are the strongest, particularly when a bowl is turned with thin walls. Also, with no pith at the bottom of the bowl, this design produces a bowl that is more stable and less prone to cracking. That said, sometimes it’s fun to mix it up a bit and turn an “end grain bowl” which means that the end grain is positioned at the bottom of the bowl. This can produce a bowl with an interesting grain pattern, with a more continuous flow around the perimeter. People who are familiar with wooden bowls will look at it and know that something is unusual, but might not be able to put their finger on what exactly is different.
Treat it if it’s wet. I do most of my bowl turning with green blanks, and end grain bowls are no exception. I have found end grain bowls to be extremely prone to cracking as they dry, so it’s important to treat the blank with the wood stabilizing product, Pentacryl, either before it is turned, or immediately afterward. If you are able to turn it shortly after it is cut, then it makes sense to treat the bowl after it is turned because you will use a lot less Pentacryl. But if it will sit for a while before being turned, you will want to treat it immediately after cutting because it won’t take long before cracks begin to form.

Cut a circular blank from the tree cross-section. Contrary to popular belief, tree trunks are not round. To avoid a lot of extra work and unbalanced turning, start by cutting a circle, watching carefully for cracking on the outside and cutting generous margins to remove cracks. I generally use a 3/8” x 3 TPI blade mounted on my bandsaw to cut bowl blanks. When your blank is ready to go, mount it on your lathe using a large diameter face plate for stability.

Be aware of the grain orientation as you turn. If you turn a lot of traditional wooden bowls, you have grown accustomed to the number one thing that bowl turners need to be good at, which is dealing with end grain. In a normal bowl turning, you fight against end grain twice on every revolution of the bowl. You will immediately notice as you round out the outside of your end grain bowl that it doesn’t fight you; the wood just peels away with no virtually no resistance. It’s a nice change of pace!

Work left to right. As you scoop out the inside of the bowl you will want to make as much of your action as possible moving from to left to right across the bowl, rather than pushing toward the bowl bottom to remove waste. By directing your cuts this way, you will expend less energy fighting against end grain, and you will be able to finish your bowl more quickly. You will also find that your gouge will stay sharp for longer periods of time.

Slightly thicker walls. I generally leave the walls a bit thicker on end grain bowls to give them more strength and stability, and to avoid having them come apart at the growth ring seams. If you are able to treat them with Pentacryl in a timely fashion, you will find that end grain bowls can be dried without cracking, and that they will shrink more evenly when they dry compared to a traditional bowl.
If you would like to watch a video of this bowl being turned, check it out on the ToolMetrix YouTube channel: