A fun winter project for any woodturner is to turn a snowman. I often times turn a smaller snowman as a warm-up exercise while I’m getting ready to turn a larger project. While it is common to use small pieces of scrap wood for this, I decided to step things up a bit this time and turn one using a large oak limb that I had cut down recently.

Choosing a log. The log was approximately 7” diameter by 15” long, fairly straight, and had no visible cracks anywhere along the surface or ends. It’s important to avoid cracking on a project this large because you really don’t want that log come apart as it spins at high speed. I mounted it onto on my Laguna 24|36 lathe using a standard face plate on one end and a live center on the other. I left all the bark on the log and decided to just turn it off rather than stripping it off first.

Make it round. As with any turning project, I started by simply turning it round and removing all the bark. A traditional spindle roughing gouge felt a bit to lightweight for this step, so I used a 5/8” Thompson bowl gouge and found it to be robust enough to handle the extreme irregularities in the surface. I actually found that the bowl gouge was a great tool for all of the shaping steps on this large project. Within just a few minutes I had a nice clean cylinder to work with.

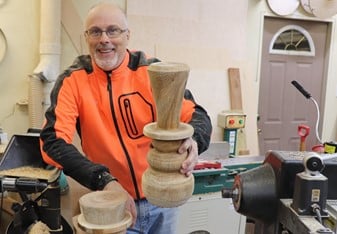
Shaping the snowballs. After the log was turned round, I began shaping the snowballs that would form the snowman. I like to turn three layers, starting with the bottom that I made a full diameter. From there, I make each of the next two layers approximately 60% of the diameter of the previous. This is an exercise of eyeballing, not measuring, as I do not apply strict quality standards to a snowman.

Sculpt the hat. Determine the height of your hat. In some cases, I make a top hat with straight sides and traditional proportions, and on others such as this one I go for a more whimsical proportion of approximately the same height as the snowman itself. On the taller hat style I like to add a convex curve to the sides, which brings out a bit more whimsy.

Clean up using “the eraser”. I refer to a negative rake scraper as an eraser because it cleans up all of tool marks left behind by the gouges. It’s not easy to get a perfect surface on a green spindle turning project, so this is an important step. This wood was so wet that sanding would have been a futile exercise, so I just got it as smooth as I could with the negative rake scraper and that was sufficient for a snowman that was destined to sit on our patio.
Preventing cracking. This project has the pith running through the center, and it started out at 45% moisture content. It is definitely going to crack badly, and I’m ok with that. If you want to reduce the changes of it cracking, you can soak it in Pentacryl to stabilize the wood. I’ve had good luck with Pentacryl on log cookie projects.
If you want to see the entire process, end to end, check out this video on the ToolMetrix YouTube channel:


