Here’s a bottle opener with a unique design that you can quickly produce in quantities. The cute little opener costs virtually nothing to make, and can be made using only a bandsaw, lathe and drill press. To keep production costs low (and creativity high!) it uses a penny as the opener mechanism rather than an expensive hardware kit, which also allows you to personalize it using a significant year on the coin (coins from virtually any year can easily be found on ebay.com). The design includes a magnet to catch the bottle caps, hidden behind a decorative accent plug.
Let’s get this spinning!

Mount up a blank and make it round. Start with a hardwood blank of 1-1/8” x 1-1/8” x 8” long mounted between centers. Any species will do, but this would be a good opportunity to use up a small scrap from a special piece of wood that you just couldn’t get yourself to toss out. Using a spindle roughing gouge, make the entire piece round except for 3/4” at each end, which will be used to keep the piece stable for later steps.

Form the handle. The overall finished piece is 4-1/2” long, with the handle comprising roughly half of the length, or 1-1/4”. Make a sweeping shape for your handle by starting to remove material in the center area of the handle, and gently widening the cut as you go deeper into the handle. After achieving a pleasing profile on the center of the handle, taper back the tail end of the handle as shown in the photo.

Turnin’ and burnin’! Next, use a woodturning wire burner to burn detail lines in the locations shown. Use a small spindle gouge or parting tool to make a small indentation to locate the burn lines. You can burn the lines without creating the location markers, but it can be difficult to keep the wire in place if you do it that way. To burn the lines, use a wire burning kit and turn the lathe up to a speed of 2000+ RPM, holding the wire in place.

Mark for recesses. You use Forstner bits will make three recesses in the bottle opener. One recess will be used to hold two pennies, the next will serve as the “pry surface” and third will conceal a rare earth magnet. First, mark the locations for the center of each recess as shown in the photo. The burn line in the middle of the bottle opener serves as the reference line, and the two holes are positioned 5/8” and 1-5/8” from the baseline respectively. The third will be milled directly in the center of the second recess. Use a nail or an awl to make a dimple at top dead center in each of the two locations that you have marked.

Drill the penny recess. Using a 3/4” Forstner pit, plunge into the work piece. Sneak up on the depth of cut, and stop when you can fully seat a penny with the top of the coin positioned at or below the top surface of the work piece.

Next Forstner plunge. Mount up a 1-3/8” Forsnter bit in your drill press, and plunge into the next witness mark, 1” over from the center of the penny recess. The depth of cut on this recess should be 3/8” below the surface of the recess that was made for the penny.

Final plunge. Using a 3/8” Forstner bit, bore a recess directly into the center of the recess that was made in the previous step using the dimple as a guide, plunging 1/4” deep.

Trim waste. Using a bandsaw, following the outer line left by the large Forstner bit and remove the waste. Cut the waste from the handle end as well.

Magnetize. Drop a 3/8” x 1mm rare earth magnet into the small recess, add some glue and tap in a plug of contrasting color. Plugs can be cut from scrap material using a plug cutter mounted on a drill press. Here I’m adding a walnut plug to a maple body.

Install two pennies. After applying your finish of choice to the opener, drill a 9/64” hole centered in each of two pennies, and attach in the recess using a bronze or copper colored screw. Add a couple drops of thick CA glue to help solidify the bond. The second penny is necessary because a single penny will bend from the force of opening a bottle. With two pennies it is extremely durable.

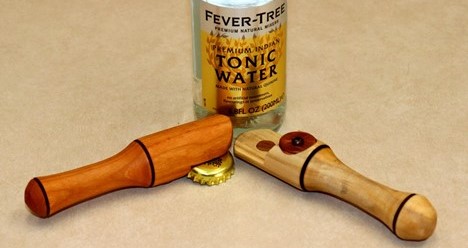
Test vigorously. There’s no better way to test your new bottle opening than by opening up a bottle of your favorite beverage!
To see a video of this project being made, check out the ToolMetrix YouTube channel.


