Late night shopping in the burl section on Ebay can be an expensive folly for a woodworker. When I found a spectacular Australian Red Mallee burl cap, I knew that resistance was futile. I was powerless against the overwhelming allure of this magnificent wood species.

Red Mallee is a tree in the Eucalyptus family that is commonly found in Australia. The trees are generally on the small side (12” diameter x 13-26 ft. tall), but they are known to produce large, solid burls with exceptional color variation ranging from pink to orangish red heartwood with pale yellow sapwood. When the burl cap (pictured) arrived, it was in good condition and its beauty and character piqued my anticipation.

Bowl gouge selection. Because the piece was relatively small, dry, and extremely dense, I decided to use a 1/2” bowl gouge rather than my usual 5/8” or 3/4” bar stock. The smaller sized gouge gave me more finesse and to make precise cuts on the delicate rim as well as the small base.
Go-time! The 11” x 8” x 2” blank cost $70 delivered, making it the most expensive chunk of wood that I’d ever worked with. It took me five months to develop the courage, but finally I mounted it onto a face plate and spun it onto my Revo 24|36.

Rough going at first. Red Mallee is extremely dense and hard. With a Janka rating (measures hardness) of nearly 2500, it is more than twice as hard as red oak. What this means to me as a wood turner is that 1) I need to sharpen more often, and I will be penalized severely for using a dull tool, and 2) it requires me to use a perfect approach angle as I’m making a cut, whereas softer woods are more tolerant of variations. My first step was to flatten the bottom to prepare for a tenon that would be used to mount in a chuck.

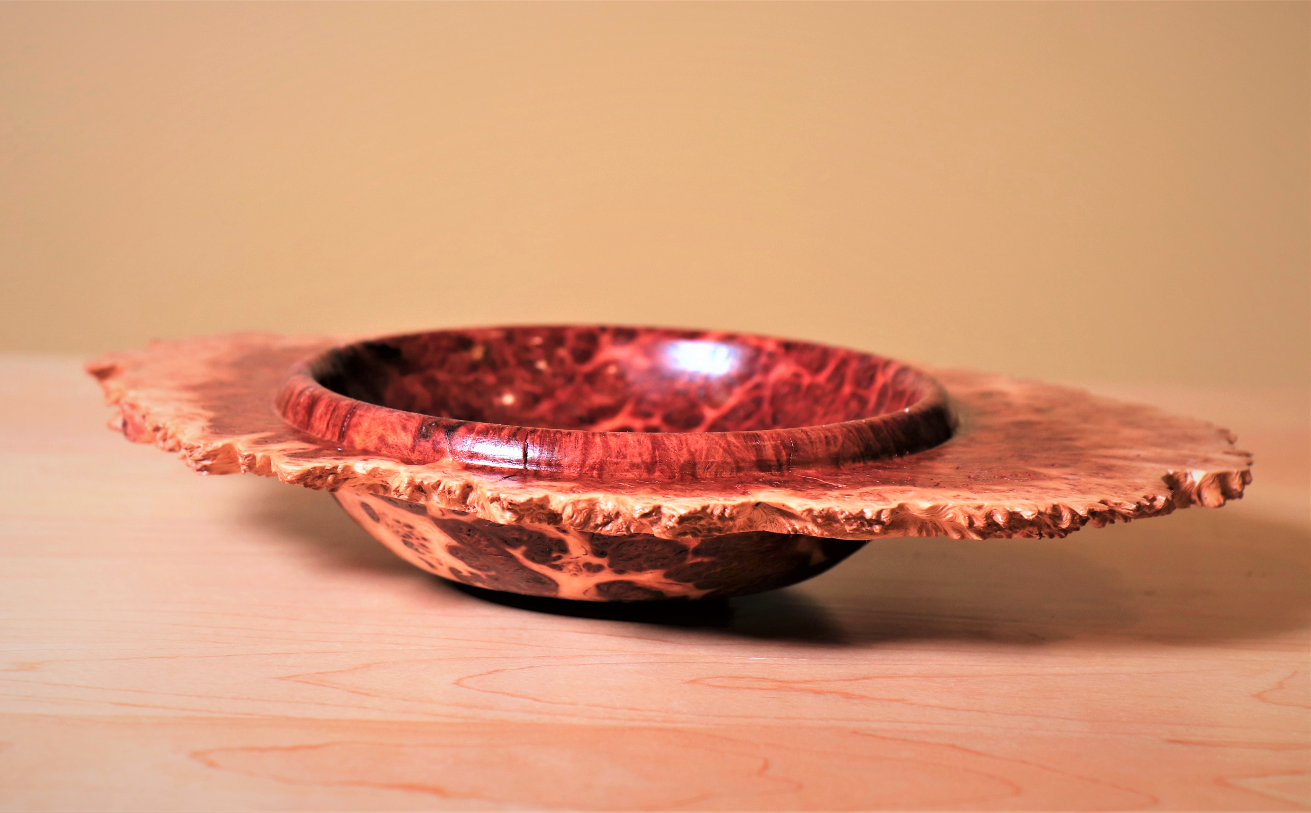
Shaping the bowl and underside of the wing. After flattening the bottom, I started to shape the bowl sides, being cautious to leave enough material for the live edge winged layer. If I went too far at this point, I would not be able to include wings on the bowl, and would have lost about 80% of the value of the bowl. With dense, dry wood, I was making cut passes of approximately 1/8”, whereas I commonly make cuts of 1/2” to 5/8” depth on common domestic green wood. I was in no hurry, and didn’t want to risk destroying this beautiful, expensive chunk of wood.

“Inny or Outie”? Normally on a bowl that is only 2” deep, I would prefer to use a recess to mount the chuck, rather than a tenon, because a recess allows you to establish a mount without losing bowl height. But for such an out of balance, expensive piece of wood, I decided to use a tenon to give me the maximum holding power on the bowl. As you’ll see below, I was able to do this without losing any height by converting the tenon itself into the base.

Bowl rim. Next I worked on the rim of the bowl. I drew a line to provide me with guidance on a rim placement that would align to the bowl bottom, giving the visual appearance of continuity. I wanted it to look like the bowl sides passed through the wings without disrupting the curved lines of the bowl walls. I turned the rim in the same way that you would turn a bead on a spindle project, starting at the top of the rim and rolling the gouge over to each side in a continuous motion.

Scooping out. After the rim was defined, I scooped out the interior of the bowl. I experience one catch that wrecked part of the rim, and I realized that my gouge had gotten extremely dull. I sharpened the gouge, returned the rim, and covered up the goof.

Sanding. With the unbalanced wings on this piece, it was important to do a lot of sanding while the bowl was stationary. I locked it in place using the indexing feature on the Revo lathe, which gave me great control.

Completing the base. I remounted the bowl using a vacuum chuck, and added some details to the tenon that converted it into an attractive base.

Crossing the finish line. I applied Danish Oil and polyurethane to showcase the colors and grain patterns of this beautiful burl.

If you would like to watch a video on the creation of this bowl, check out the ToolMetrix YouTube channel.


