The reason that I love owning a massive lathe with a large swing capacity is that it gives me the ability to turn large, gnarly chunks of wood without any hesitation. I turned this 19” serving tray on my Revo 24|36 from a chunk of Kentucky Coffee Wood that was harvested by my logger friend. I had never worked with this species and hadn’t even realized that it grew in the north land where I live, so I was eager to give it a try. I found the wood to be hard and dense, and virtually identical in working characteristics to white oak, which is far more plentiful in my area.

Rough cut. This project was somewhat unusual in that I started with a slab that had been cut on a sawmill, so my first step was to cut off a length of the slab. I marked a length of 20” which was slightly longer than the width of the slab. I used a track saw to make the cut, which had plenty of power for the thick dry slab.

Cut out the blank on a bandsaw. Next I drew a circle on the piece and took it to the bandsaw where I cut to the outside of the line on the circle.

Large face plate for a solid mount. For large work like this, I prefer to use a 6” face plate because it does a great job stabilizing the piece, which is critical, particularly in the early phases of turning before the piece balances out.

Peeling cuts to flatten the face. Using the wing on my bowl gouge, I made a few bevel-supported passes across the bottom surface. This is an easy way to flatten the bottom to create a good spot for the chuck mount.

Form the mounting recess. On a large piece like this I normally like to use a tenon, but I wanted to preserve as much material as possible to create a deep tray, so I opted for a recess instead which doesn’t require any loss of depth. I used a bowl gouge with a 40 degree nose angle to form the dovetailed recess.

Push cuts to shape the bottom. Using a 5/8” bowl gouge I shaped the contour of the bottom. I opted for a simple curve with a wide foot for good stability on this piece as it will be used to serve large quantities of food and beverages and not just provide ornamental value.

Define the rim. After flipping the bowl around and mounting on a four-jaw chuck the first thing that I do is define the rim. On this tray I created a steep downward angle with a gentle curve with a consistent line going all the way to the base of the tray.

Scooping out the middle. After the rim is defined, I use a series of plunge cuts straight toward the bottom to remove the majority of the material.

Forming the bottom. When I got close to the bottom I used my gouge to smooth the surface, used a straight edge to check for flatness, and gradually removed material to make the bottom flat and about 3/8” thick.

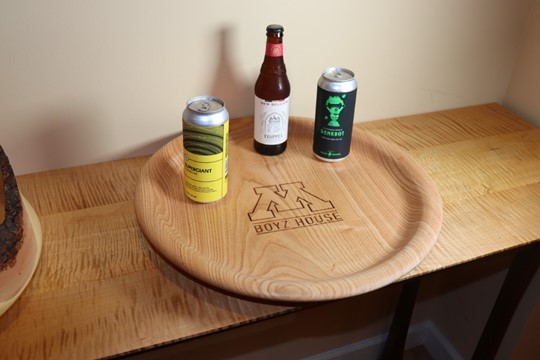
Laser engraving. I used my PL12|20 Laser Engraver to engrave a graphic that represents the house where the piece will be used. I find that laser engraving is a simple but effective way to personalize a piece. When I add laser engraving to a project, I commonly notice an increased level of delight on the part of the recipient.

Finish. I used a durable polyurethane finish to protect from moisture and abrasion.
If you’d like to see a video of this piece being created, check out the ToolMetrix YouTube channel.


